This Article shows you how to set preferences in CheckMark Payroll Software and view options and select the font for printing.
Payroll Preferences
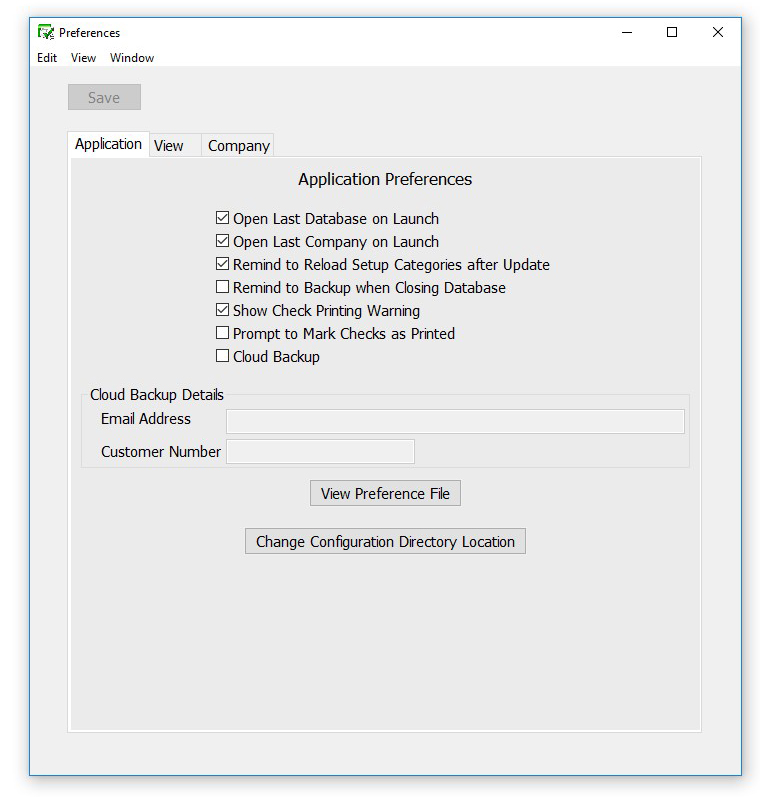
You can use the Preferences window under the File menu to set various CheckMark Payroll options.
- Choose Preferences from the File menu.
- Check or uncheck the preferences.
- When you have finished setting the preferences, close the window, then click Yes when prompted to save changes.
Application Preferences
| Open Last Database
on Launch |
When checked, the last used Payroll database will open automatically when you launch CheckMark Payroll. |
| Open Last Company
on Launch |
When checked, the last used Payroll company will open automatically when you launch CheckMark Payroll. |
| Remind to Reload
Setup Categories after Update |
This option will prompt you to reload all setup categories after an update making sure you stay current with any tax table, deduction or income changes. |
| Remind to Backup
when Closing Database |
When checked, you will be prompted to make a backup of the database you’re in when you close. |
|
Show Check Printing Warning |
When checked, a warning appears if you have Middle Check selected on the Print Paychecks window and you have more than four Additional
Incomes or eight Deductions assigned to an employee. If you have more than four Additional Incomes and/or eight Deductions for your employees, we recommend you buy check stock with the check on top. |
| Prompt to Mark Checks as Printed | When checked, you will see a prompt when you print checks asking if you want to mark the checks as printed. You can select Yes or No to
mark or not mark the checks as printed. If this preference is NOT checked, all checks will be automatically marked as printed after you print them. |
| Show Critical News
Only |
When checked, the newsfeed on the Command Center window will show only critical information posts. |
| View Preference File | Select this option to view all the Preferences settings for the open company. |
| Change Configuration
Directory Location |
When selected, you can move the “CheckMark” Directory that contains the company database to another location of your choosing. |
View Preferences
- Choose Preferences from the File menu.
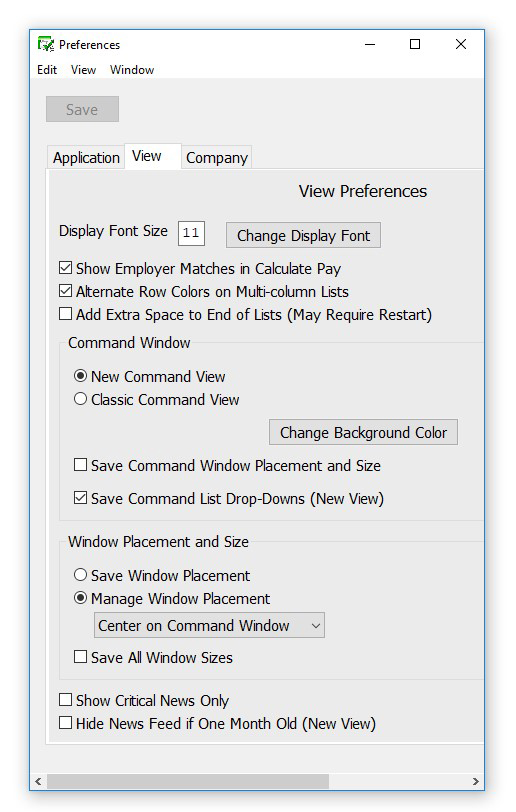
- Click the View tab. Check or uncheck the preferences.
- When you have finished setting the preferences, close the window, then click Yes when prompted to save changes.
| Show Employer
Matches in Calculate Pay |
When checked, this option will display the employer matches in the Calculate Pay screen when creating checks. |
| Display Font Size | You can customize the window size in CheckMark Payroll by increasing or decreasing the font size for all windows. Simply enter a number, a lower number will decrease the window size and a higher number will increase the window size. |
| Change Display Font | You can change the size and display font for most screens throughout payroll. Click on the Change Display Font button and choose which font and size you would like. |
| Command Window | You can change the Command Screen (main screen) from the new command view or use the classic view by clicking the corresponding radio button. |
| Change Background
Color |
Clicking on the Change Background Color button allows you to change the color of reset to the default color for the Command Screen view. |
| Save Command List
Drop-Downs (New View) |
With the New Command Screen View, you can select this box to save whatever drop down menus you had open before closing. Those menus will re-open automatically when you open Payroll back up. |
| Save Window
Placement |
When selected, if you reposition windows within the payroll program, the new positions are saved. |
| Manage Window
Placement |
When selected, you can choose the following option from the dropdown
menu: Center on Screen (Default)– When selected, the Command Center will appear in the center of your screen and all report windows when open will appear one on top of the other. Cascade from Right (Classic)- When selected, the Command Center appears in the top left of screen and reports appear to the right of the command center cascading from left to right down the screen. Cascade from Left- When selected, the Command Center appears in top left of screen and reports appear on top of command center cascading from left to right down the screen. |
| Save Window Size | When checked, if you resize windows within the payroll program, the new sizes are saved. |
Company Preferences
- Choose Preferences from the File menu.
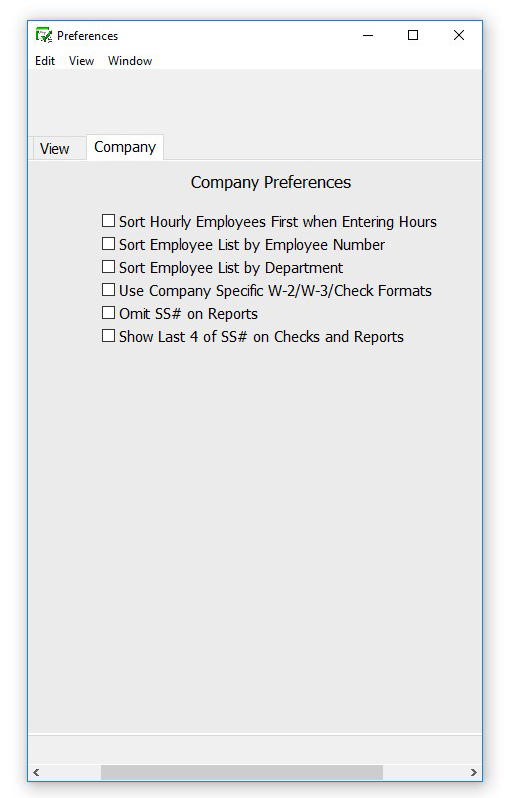
- Click the Company tab. Check or uncheck the preferences.
- When you have finished setting the preferences, close the window, then click Yes when prompted to save changes.
| Sort Hourly
Employees First When Entering Hours |
When checked, CheckMark Payroll shows hourly employees first in
the employee list on the Enter Hours window. |
| Sort Employee List by
Employee Number |
When checked, the employee number will appear before the employee
name. Lists and reports will be sorted by employee number. |
| Sort Employee List by
Department |
When checked, the Department assigned on the Personal view tab (on
the Employees window) will appear above employee names (employees will be listed alphabetically within the department), and employee lists and reports will be sorted by department. |
Note: If both the Sort Employee List by Employee Number and Sort Employee List by Department options are checked, employee lists and reports will be sorted by department first, then by employee number within each department. Employees with no department or employee number assigned will appear alphabetically at the top of the list.
Use Company Specific W2/W3/Check Formats
Select this option if you keep separate formats for each separate company. If this option is not checked, one format will be used for all companies within the database.
Selecting the Print Font
Omit SS# on Reports: When checked, employee social security numbers will not appear on any reports except W-2 reporting and the California DE-6.
Show Last 4 of SS# on Checks and Reports
When selected, this option will only show the last 4 digits of the Social
Security number on Checks and Reports.
Selecting the Print Font
You use the Select Print Font window under the File menu to select the font for printing checks and reports.
- Choose Select Print Font from the File menu.
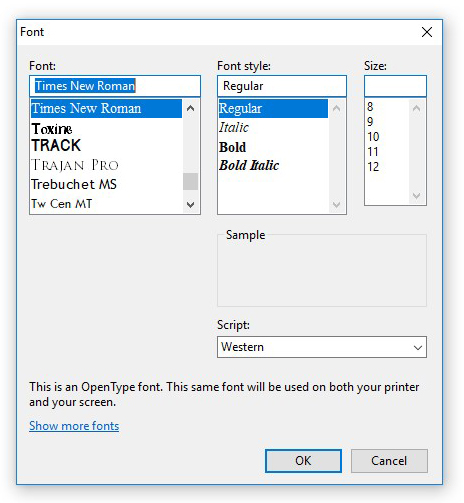
- Select the font, font style, and font size.
The fonts listed are the fonts installed in your system. You can use fonts sizes from 8 to 14 points with CheckMark Payroll. To install or remove fonts, see your computer’s owner’s guide.
- Click OK.
View Menu Options
You can use the options under the View menu to set the Command Center Window color, as well as increase or decrease the screen font size for Payroll windows.
Changing the Window Font Size
You can customize the window size in CheckMark Payroll by increasing or decreasing the font size for all windows.
- Choose Increase Font Size CTRL = (Windows) or COMMAND = (Mac) from the View menu.
Or, choose Decrease Font Size CTRL – (Windows) or COMMAND – (Mac) from the View menu.
Changing the Display Font
You can change the display font for better, more customized viewing on your screen for most areas.
- Choose Change Display Font… from the View menu.
- Select which font from the list you would like to change to. You can also select the Font Size.
- Click OK.
Changing the Command Center Window Color
- Choose Change Color from the View menu.
The Choose Color window appears:
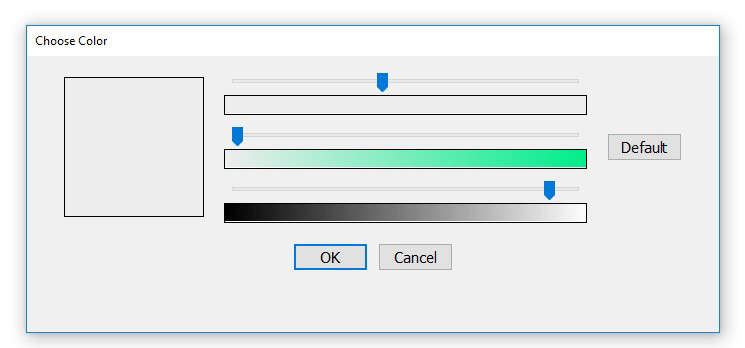
- Use the arrows to move change the color as you like.
- Click OK to save the color, or click Cancel to leave the window without changing the color.
NOTE: You can always reset to the default Command Center Color by clicking
Default, then OK.

