Hour Worked: If you choose Hour Worked, the employee will receive the number of hours entered in the edit box per hour worked. You can also limit the maximum hours that are used to determine the earned hours for each pay period. The employee will start receiving the accrued hours on the first pay period dated after the date in the Start Receiving box. If no date is entered, the employee will start receiving the accrued hours on the next paycheck.
If you choose Hour Worked as the accrual calculation method, you should select the Use in Calculations Based on Hours Worked option on the Hour Categories window for each Hour Category that should be included in the accrual. For example, let’s say that you have two hour categories defined as Regular and Vacation and you would like Vacation to accrue at a rate of .025 hours for every hour worked. You should check the Use in Calculations Based on Hours Worked option for the Hour Category Regular in order for the Regular hours to be included in the Vacation accrual.
Pay Period: If you choose Pay Period, the employee will receive the number of accrued hours entered in the box each paycheck. The employee will start receiving the accrued hours on the first paycheck after the date entered in Start Receiving. If no date is entered in the Start receiving date box, the employee will start receiving the accrued hours on the next paycheck.
Setting Up Employee YTD Balances Mid Year
Depending on when you process your first payroll with CheckMark Payroll, you might need to set up employee YTD balances for your employees’ income and deductions.
You don’t need to enter year-to-date balances if:
- The first payroll you process with CheckMark Payroll is the first payroll of the year.
- You are using CheckMark Payroll to process the first payroll for a new business.
- You aren’t using CheckMark Payroll for keeping employee records.
By carefully setting up your employees’ year-to-date balances and entering after-the-fact paychecks from the current quarter, you can help ensure accurate records for reports, such as 941s and W-2s. Here’s a brief overview of what to do:
Note: YTD balance figures in the Employee Set Up tab affect annual reports.
Quarterly reports are calculated on the actual paychecks created in CheckMark Payroll. YTD balances are needed for accurate calculation of taxes with an annual wage limit such as SS, FUTA and SUTA taxes.
- Enter starting balances as of the last completed quarter in the current year. For example, if you are going to process your first payroll with CheckMark Payroll on August 16th, enter the starting balances as of June 30th.
- Calculate and Save after-the-fact paychecks that were issued in the current quarter.
After-the-fact paychecks are paychecks that were issued prior to using CheckMark Payroll.
Again, if you are going to process your first payroll with CheckMark Payroll on August 16th, enter after-the-fact paychecks issued between July 1st and August 15th.
For details, see “Calculating Pay for After-the-Fact Checks.”
If you are going to process your first payroll with CheckMark Payroll at the beginning of a quarter, you don’t have any after-the-fact paychecks in the current quarter.
- Create the after-the-fact payroll checks in CheckMark Payroll.
Paycheck calculations do not affect an employee’s record until you create the paycheck in CheckMark Payroll.
For details, see “Creating Payroll Checks.”
Entering Year-to-Date Income and Deductions
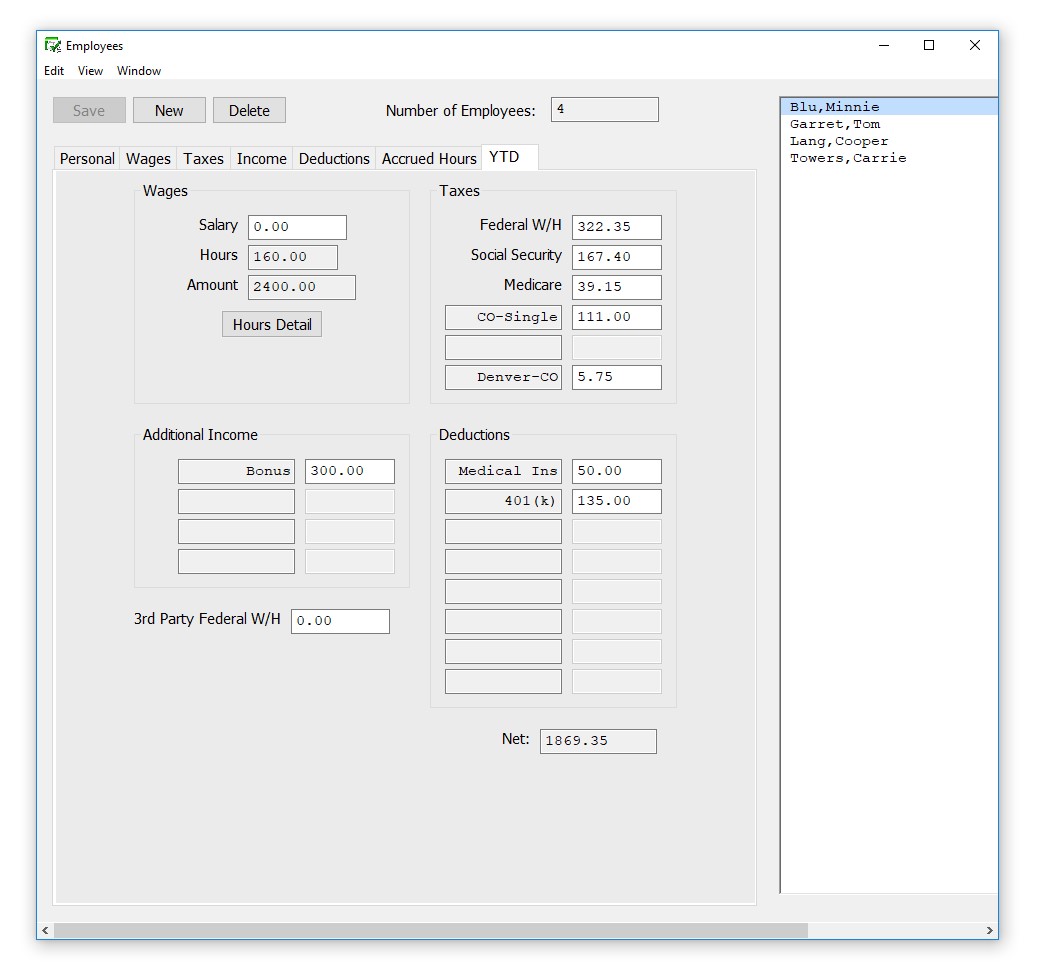
- Select the YTD view tab on the Employees window.
- Select an employee from the employee list if one is not already selected.
- For a salaried employee, enter the employee’s year-to-date salary as of the last completed quarter in the Salary edit box.
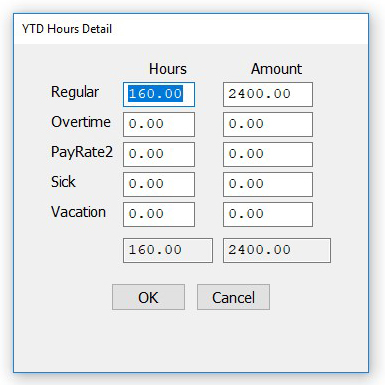
- Fort an hourly employee, click the Hours Detail button and enter the year- to-date hours and amounts for each hour category as of the last completed quarter.
Tip: If you don’t want to enter the year-to-date amounts in for each hour category, you could enter the total amount in the Salary edit box.

Note: When setting up, you don’t have to enter year-to-date hours to calculate the value shown for Amount on the YTD Totals view tab.
- Click Save to close the Hours Detail window and update the Hours and Amount fields on the YTD view tab.
- Enter the year-to-date amounts for the Additional Income categories.
The Additional Income categories that appear are those that were assigned to the employee in the Additional Income view tab.
- Enter the year-to-date amounts for the Deduction categories.
The Deduction categories that appear are those that were assigned to the employee in the Deductions view tab.
Note: The Additional Income or Deduction categories will not show in the YTD tab unless the Save button has been selected for the employee. If the categories do not show up in the YTD tab, click Save, then re-select the employee from the list.
- Enter the year-to-date amounts for each tax category.
The state and locality names that appear are those that were set up for the employee with the Taxes view tab.
9. Click Save or select another view tab and continue setting up the employee when you’ve finished entering the year-to-date balances.

