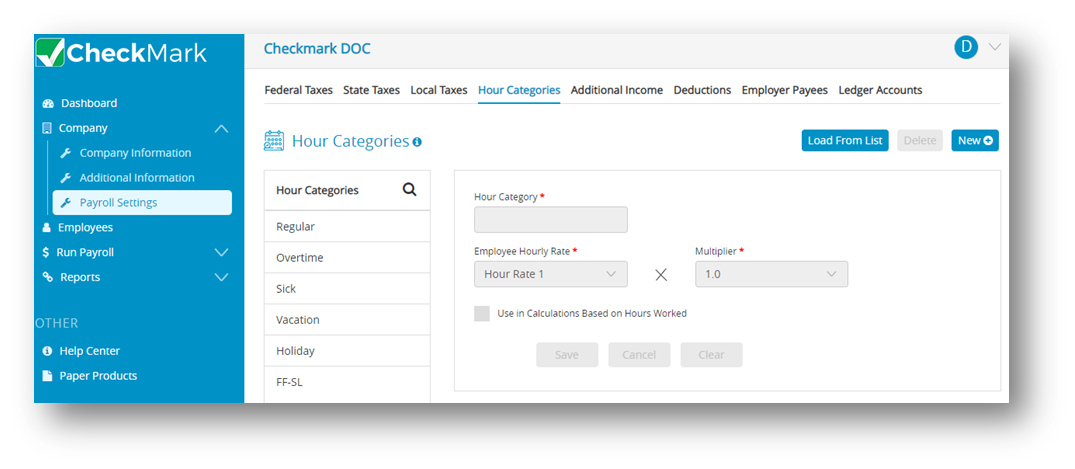
This article provides information about how to set up hour categories for CheckMark Online Payroll. Hour categories refer to the various classifications of hours that a company utilizes for determining the wages of its hourly employees. You can also add new or set up accrued hour categories, such as sick and vacation.
Note: You can define up to 12 hour categories for your company.
Important: You should carefully choose the order of the hour categories in the Hour Categories list because it determines the order of their appearance on the Distribute Hours and Enter Hours windows. Setting up hour categories according to their frequency of use with the most used hour category first is recommended.
Once you’ve created at least one set of payroll checks or set up beginning year-to-date balances with the YTD view mode on the Employees window, you should not change the order, delete or modify the names since this could adversely affect these balances.
CheckMark Online Payroll comes with several pre-defined hour categories. Click the Add from List button in the Hour Categories window for a complete list. You can add a pre-defined hour category to your company, and then use it as is or change its definition.
Adding Pre-Defined Hour Categories to Your Company
- Click Company, select Payroll Settings and then click Hour Categories.
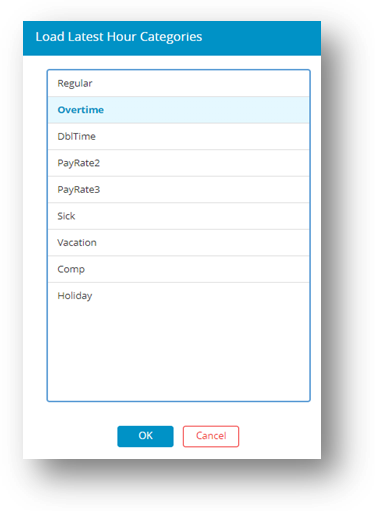
- Click Load From List, and then select one or more hour categories from the list.
Note: To select more than one hour categories, drag through the list and to select non-consecutive categories, hold down the CTRL key for Windows or Command key for Macintosh and click the desired names.
- Click OK.
Step result: Categories will be loaded in the list.
You can also perform the following actions in the Hour Categories window
Creating a New Hour Category
If you need an hour category that isn’t pre-defined in CheckMark Online Payroll, click New to create a new category.
- Click Company, select Payroll Settings and then select Hour Categories.
- Click New, enter name.
Note: Name can be up to 8 characters for the hour category. - Click OK. The new category should be added to the list of Hours Categories.
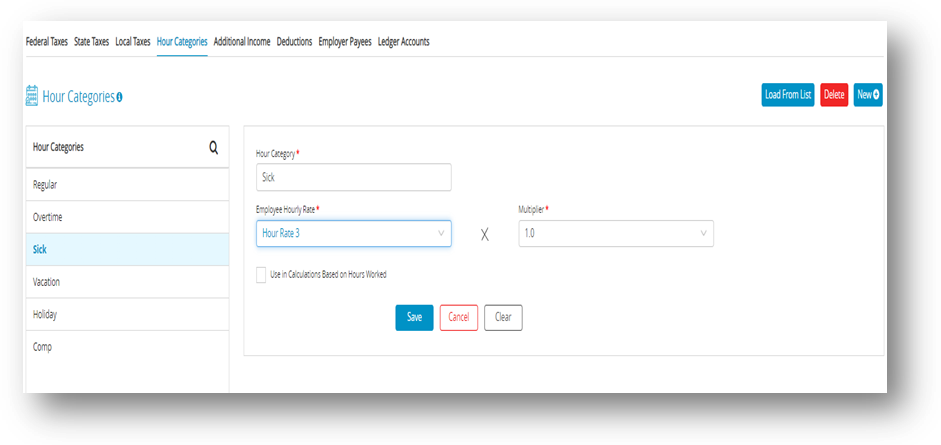
- Select the Hour Categories from the Hour Categories list.
- Select Employee Hourly Rate drop-down to select hour rate and then select Multiplier drop-down to calculate hourly rate.
For example: Regular would be defined as Hour Rate 1 x 1. Overtime would be defined as Hour Rate 1 x 1.5. Employee Brian makes $8/ hour. Regular hours would be paid at $8/hour (1 x $8) and overtime at $12/hour (1.5 x $8).
Calculations Based on Hours Worked: Check this option if the hours in this category should be included for income and deduction calculations based on Fixed Amount/Hour Worked.
You should also check this option if you plan on accruing hours such as vacation or sick based on hours worked. For example, you wish to accrue vacation on regular hours worked. Check this option on regular so that each hour worked by those employees would accrue vacation on them at the rate set on the Employee window. - Click Save.
Modifying an Hour Category
It is strongly advised not to modify an hour category once you have set up at least one check or established year-to-date (YTD) balances on the Employee window, as doing so may have a negative impact on the balances.
- Click Company, select Payroll Settings and then select Hour Categories.
- Select the hour category from Hour Categories list.
- Use the Employee Hourly Rate and Multiplier drop-down lists to change the hour category.
- Click Save.
Deleting an Hour Category
Deleting an hour category is only recommended if there are no existing employee checks or year-to-date balances associated with it to prevent any potential negative impacts on the data.
- Click Company, select Payroll Settings and then select Hour Categories.
- Select the hour category from Hour Categories list.
- Click Delete.
Step result: A pop up appears asking you to verify that you want to delete. - Click Yes.

