Types of W-2/W-3 Reports
| Types | Description |
| W-2 on blank paper | Select from this drop-down list, according to the following guidelines:
✓ 4-up Employee All Copies- This is for printing employee Copies B, C, and 2 on 4-up blank, perforated paper. ✓ 2-up Employer Copy A- This is for printing employer Copy A on plain paper (minimum 20 lb. weight). ✓ 2-up Employer Copy 1- This is for printing employer Copy 1 on 2-up blank, perforated paper. ✓ 2-up Employer Copy D- This is for printing employer Copy D on 2-up blank, perforated paper. ✓ 2-up Employee Copy B- This is for printing employee Copy B on 2-up blank, perforated paper. ✓ 2-up Employee Copy C- This is for printing employee Copy C on 2-up blank, perforated paper. ✓ 2-up Employee Copy 2- This is for printing employee Copy 2 on 2-up blank, perforated paper. |
| W-2 on preprinted form (2-up) | This is for printing employee and employer W-2s on preprinted W-2forms. |
| W-2 on blank paper | Select this option for printing on a W-3 form on plain paper (minimum 20 lb. weight). |
| W-3 on preprinted form | Select this option if you are printing on a preprinted W-3form. |
| EFW2 File | Select this option if you are required to file electronically with the Social Security Administration or your state. Note: Not all states are supported using the EFW2method. |
Creating W-2 and W-3 Reports
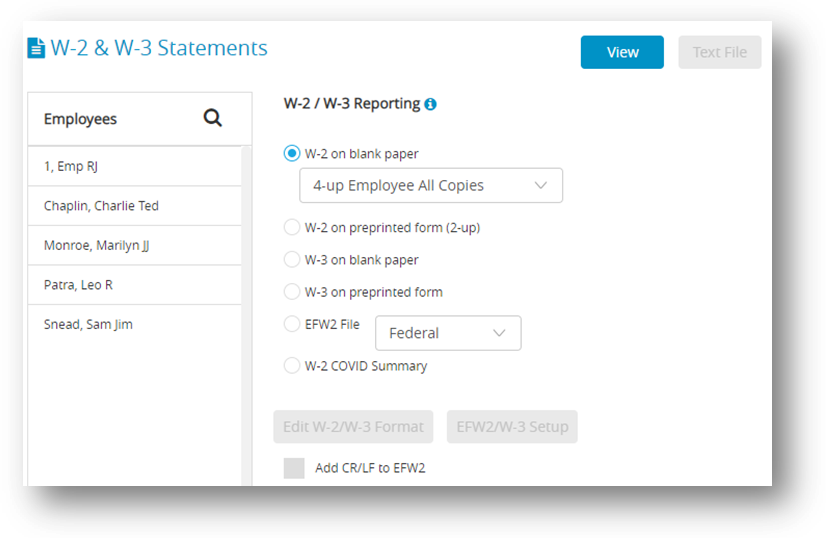
The W2 & W3 Statements window allows you to print W-2 and W-3 information on blank perforated sheets or pre-printed forms. You can also save your W-2/W-3 information in the EFW2 file format for electronic filing.
✓ Withholding for Two States
CheckMark Online Payroll will print State wages and State withholding for up to two states as long as you have not started mid-year or edited YTD totals on Employee Setup. If an employee has income in two states, at least one state needs to have at least $0.01 withheld for the program to recognize both states. If you have with held for more than two states, you need to prepare multiple W-2s. This can be accomplished by setting up a new employee for each state requiring wages and withholding.
✓ Verify Company Information
Before printing W-2s, you should verify your company name, address and Federal ID are correctly entered on the Company Information window. Your State ID can be verified by selecting State Taxes under the Setup menu. Select each state table from the State Taxes section and verify the State ID.
✓ Dependent Care Benefits – Box 10
If you have a dependent care assistance program (section 129 or section 125 cafeteria plan), the expenses paid or fair market value of those services should be shown in Box 10. Check the applicable box in Additional Income or Deduction setup.
✓ Non-Qualified Plans – Box 11
This checkbox indicates distributions made to an employee from a non-qualified plan or deferrals under such a plan that became taxable for social security or Medicare taxes during the year but were for services provided in a previous year. It should be selected under the Additional Income setup screen. Additionally, in the Additional Income setup, mark the checkbox if the plan is a Section 457(b) plan.
✓ Deductions Appearing in W-2 Boxes 12a – 12d
Certain deductions should be listed in Box 12 with their appropriate letter code. Refer to the IRS publication Instructions for Form W-2 for a reference guide of Box 12 Codes. The code “D” that is associated with the 401(k) contribution does not have any bearing on the position in box 12 that the information prints. From the IRS W-2/W-3 instructions: “Box 12-Codes. Complete and code this box. Note that the codes do not relate to where they should be entered for boxes 12a-12d on Form W-2.” If you wish more explanation regarding printing of your W-2 information, there is a copy of the W-2/W-3 instructions in .pdf format located in the IRS forms folder inside the Payroll folder on the hard drive of your computer, or you can download a copy from the IRS website at www.irs.gov.
✓ Box 13 Check Boxes
On the Employee Setup window, under the Taxes tab, check the box Statutory Employee for employees whose earnings are subject to social security and Medicare taxes but not subject to Federal income tax withholding. There are workers who are independent contractors under the common-law rules but are treated by statute as employees. These are called statutory employees. See Pub. 15-A for details. Check the box Retirement plan if the employee was an “active participant” (for any part of the year) in any of the following retirement or annuity plans: 401(a), 401(k), 403(a), 403(b), 408(k) (SEP), 408(p) (SIMPLE), 501(c)(18), or a plan for Federal, state, or local government employees. Do not check this box for contributions made to a nonqualified or section 457(b) plan. Check the box Sick Pay if any employee received sick pay benefits during the year from a third party.
✓ Box 14 – Other
Box 14 can be used for information (Income or Deduction items) that you wish to identify for your employees. Examples include state disability insurance taxes withheld, union dues, uniform payments, health insurance premiums deducted, nontaxable income, educational assistance payments, or a clergy’s parsonage allowance and utilities. Check the Box 14 W-2 Options in the Setup window for the Additional Income or Deduction you wish to report. On the W-3 in Box 14, employers that had employees with Federal withholding by a third-party payer will show amount withheld on sick pay of all employees this applies to. This amount is also included as part of the total in box 2 for the W-3. This amount must be reported in both places.
✓ Box 15
Box 15 shows State/State ID#. If you withhold in more than one state, there will be an ‘X’ showing in this box and no state ID entered. An ‘X’ will appear on the W-3 in box 15 if you withhold for more than one state in a single payroll company.
✓ Furnishing Copies B, C, and 2 to Employees
Furnish copies B, C, and 2 of Form W-2 to your employees, generally, by January 31st. You will meet the “furnish” requirement if the form is properly addressed and mailed on or before the due date. If employment ends before December 31st, you may furnish copies to the employee at any time after employment ends, but no later than January 31st. When an employee asks for their Form W-2, give it to them within 30 days of their request or the final wage payment, whichever is later. If you can’t do this because the business has ended, or for some other reason, check the IRS Instructions for Forms W-2 and W-3 for help.
Printing on Blank, Perforated W-2s and W-3s
- Click Reports drop-down option from the menu and then click Payroll.
- Click W-2 & W-3 Statements.
- Select the employees from the list.
Note: You can select a consecutive or non-consecutive set of employees in the list. For a non-consecutive series of employees, hold down the Ctrl (Windows) key or Command ( ) key (Mac) while clicking individual employees in the list. If no employees are selected, W-2s for all employees will be printed. Employees with no wages paid in the calendar year will not be reported nor have a W-2printed. - Load your printer’s paper tray with 4-up perforated blank sheets. 4-up perforated blank sheets are used to print the employee W-2 copies.
Note: You may want to select one employee to print a sample 4-up perforated blank sheet first before printing all your employees to make sure that the sheets are loaded into your printer correctly. - Make sure the W-2 on Blank Paper radio button is selected and 4-up Employee All Copies is selected in the drop-down list.
- Click View.
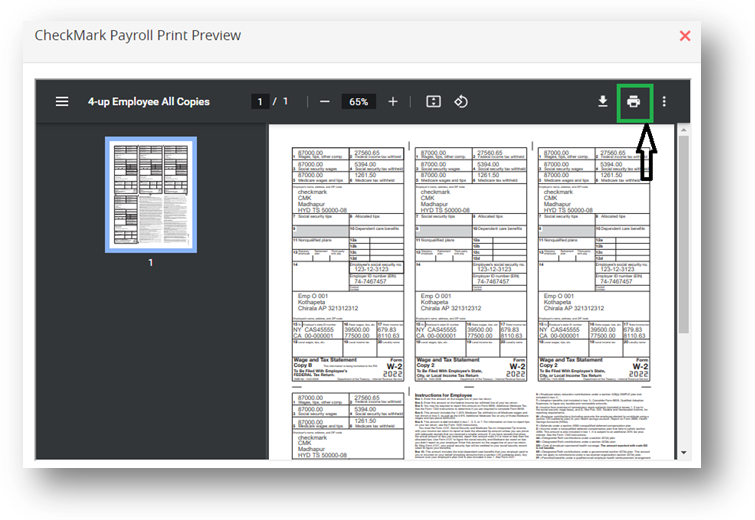
Step result: A preview window appears, click print icon for printing.
- Select the destination and click Print.
- After you have printed the employee W-2 copies on the 4-up perforated blank sheets, load the 2-up perforated blank sheets into your printer’s paper tray.
- Select the W-2 on Plain Paper radio button and then select 2-up Employer Copy 1 form the drop list.
- Click View.
Printing the W-3 Form
- Make sure your printer’s paper tray is loaded with blank paper.
- Select the W3 on blank paper radio button.
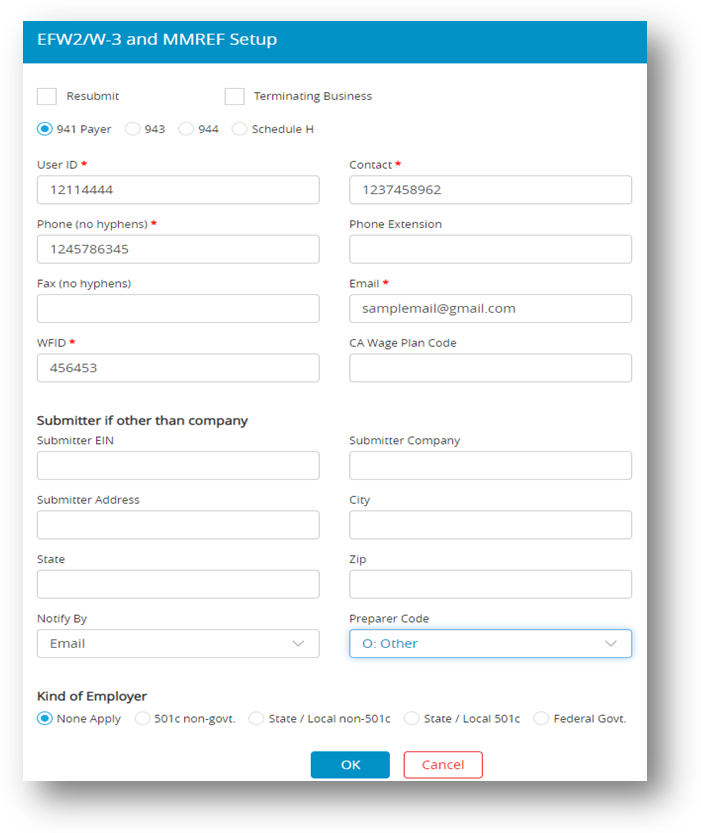
- Click the EFW2/W3 Setup.

- Enter your company’s contact, phone, fax, and email information in the fields.
- Click OK.
- Click View and then click print icon to print the form.
Note * Plain Paper: Use to print the W-2 Federal Copy A and W-3 Transmittal Copy. Red printed copies are no longer required for these two forms. CheckMark does not sell Plain Paper. You can use the 20 lb. white paper found in most offices for copiers or printers.
Printing on Preprinted W-2s and W-3s
Important: Print a Sample W-2 andW-3 before you print the W-3 and W-2s for all of your employees, you should print a sample W-2 and a sample W-3 on blank paper to make sure that the alignment is correct, and that the amounts are printing in the correct boxes. Each type of printer will print slightly different, and you may need to adjust the fields for your specific printer. If the alignment is incorrect, see the section below, “Fixing Alignment Problems.”
Resetting the Default: You can reset the default on the pre-printed W-2 or W-3 form by going into the W-2 & W-3 Statements window, clicking on either the W-2 on preprinted forms or W-3 on preprinted form option, hold down the Shift key on the key board and click the Edit Format button.
If the alignment on the sample W-2 or sample W-3 you printed above is incorrect, follow these steps:
- Click Reports drop-down option from the menu and then click Payroll.
- Click W-2 & W-3 Statements.
- Select the W-2 on preprinted forms or W-3 on preprinted form radio button and then click Edit W-2/W-3 Format.
Step result: The below Format window appears. - Move the field or fields that need adjustment.
Third-Party Sick Pay Reporting on the W-2 and W-3 Statements
- Click Company, select Payroll Settings and then select Additional Income.
- Click New. Enter a description of income such as “Sick Pay” and click OK.
Note: You are limited to 12 characters. Set the Calculation Method as Variable. - Select Employees on the Menu.
- Select an employee from the list and then select the Taxes tab at the top.
- Mark check box for the Sick Pay in W2 Options and then click Income tab.
- Under Company Categories drop down select “Sick Pay” click Assign and then click Save.
- Reselect the same employee from the list and then click YTD tab. In the box labeled “Sick Pay” and modify the amount from 0.00 to gross wages paid by third-party payer. Also, modify Social Security and Medicare amounts to amount shown plus the amount withheld by third-party payer. If necessary, enter the amount of federal withholding withheld on sick pay in the box labeled “3rd Party Federal W/H” and the Save.
- Repeat steps 3-7 for all employees paid sick pay by a third-party payer.
- Select W-2/W-3 Statements on the Command Center window.
- Print W-2’s and W-3 statements.
Creating Electronically Filed Reports
You can save a file from CheckMark Online Payroll that you can use to submit W-2 information to the SSA electronically in the EFW2 format. For more information on submitting W-2 information electronically, see the Social Security Administration (SSA) publication about Electronic Filing (EFW2) online at https://www.ssa.gov/employer/.
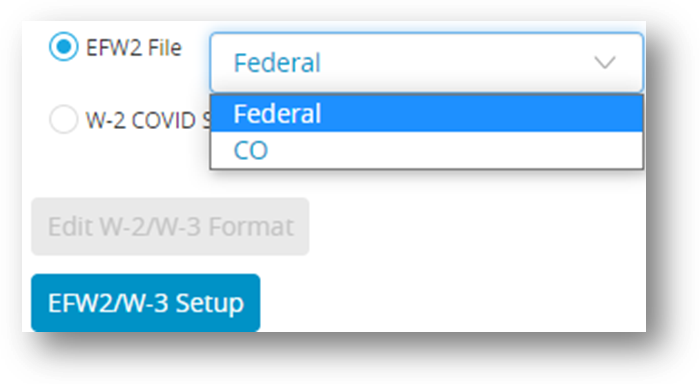
CheckMark Online Payroll also allows you to save State information for filing electronically. For a list of available states, click the drop down list next to the EFW2 File button.
Saving Federal and State Electronic Information in the EFW2 Format
Before you save the information as a file, you should verify some information for your company and your employees. Generally, if you’ve already printed W-2s for your employees and all of the information is correct, you can save the information as a file. You should make sure that:
✓ Your company name, address, and Federal and State ID numbers are correct on the Company Information and State Taxes windows.
✓ Each employee should have a valid 9-digit Social Security Number.
✓ Any deferred compensation or pension plans have been setup correctly in CheckMark Payroll and correctly assigned to the employees.
To save electronic file information in the EFW2 format, follow these steps:
- Click Reports drop-down option from the menu and then click Payroll.
- Click W-2 & W-3 Statements.
- Click the EFW2 File radio button.
- Select Federal or your state from the drop-down list.
Note: Some states require <CR><LF> between each record in order to file electronically. If necessary, select check box Add CR/LF to EFW2 before creating your state’s EFW2 File. For more information, check with your state or see your states website.
- Click the EFW2/W3 Setup.
- Enter the correct data for your company and then click OK.
Note: If you are filing the EFW2 file on behalf of another company, you can enter your own Submitter information in the Submitter EIN, Submitter Company, Submitter Address, City, State, and Zip fields. Otherwise, CheckMark Payroll will use the Federal ID, Company, and Address information from the Company Information window. - Click Text File.
Step result: A text format file should be downloaded and the file appears with all the details. The default name for the file is “W2REPORT.TXT.” Do not change this name unless your state requires a different file name.
Important: Note For Federal Filing: After saving the W2REPORT.TXT text file, you should run the Social Security Administration’s software, AccuWage, to make sure that the information is correct before submitting the file. For more information on AccuWage, see https://www.ssa.gov/employer/.

