Formatting Checks, W-2s, and W-3s
Follow our step-by-step guide to learn how to format checks, W-2s, and W-3s in CheckMark Payroll to ensure accurate and efficient payroll processing. You can reposition items that print on checks, or pre-printed W-2s, and W-3s to align printing for your particular printer or form.
- Click the Edit (Win) or Edit Check Format (Mac) button on the appropriate window.
To format employee paychecks and employer payment checks, use the Print Paychecks window. To format W-2s and W-3s, use the W-2 & W-3 Statements window.
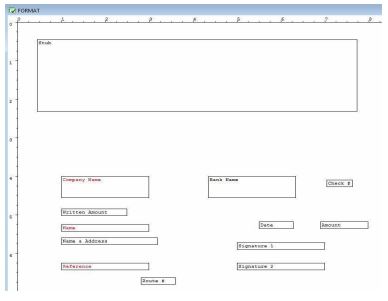
A format window appears that allows you to reposition the fields. For example, clicking the Edit button (Win) associated with the
Custom Check Format area on the Print Paychecks window opens the following window:
Use this Format window to position the fields that print on checks. Employer checks use the field positions set up for employee paychecks.
- Drag the print fields to their new positions.
To move a single field to a new position, position your mouse pointer over the field, hold your mouse button down and move your mouse in the direction of the new position. You can also use the directional arrows on your keyboard to move the selected field.
To select a group of print fields, hold down the SHIFT key while clicking individual fields or drag over the fields until all the desired items are at least partially contained within the box. The selected fields should be highlighted. Holding down the SHIFT key and moving one field will move the entire group.
To restrict movements to vertical positioning, hold down the ALT key (Windows) or OPTION key (Mac) while moving dragging the field or fields. To restrict movements to horizontal positioning, hold down the CTRL key (Windows) or Command (�) key (Mac) while dragging the field or fields.
To prevent a field from printing, double-click the field or select the field and press the space bar. The field’s name will become red. To re- enable the field for printing, double-click the field again or select the field and press the space bar. Its name will become black.
- When you’ve finished repositioning the print fields, close the window.
- Click Yes to save the format changes.
Resetting the Default
You can reset the default format placement for checks and W-2/W-3 reports.
Checks
To reset the default check format, open the Print Paychecks window. Click either the Custom-Check in Middle or Custom-Check on Top option. Hold down the Shift key on the keyboard and click the Edit… button.
W-2 and W-3
You can reset the default on the pre-printed W-2 or W-3 form by going into the W-2 & W-3 Statements window, clicking on either the W-2 on pre-printed forms or W-3 on pre-printed form option, hold down the Shift key on the key board and click the Edit Format button.

