Printing the Payroll Checks
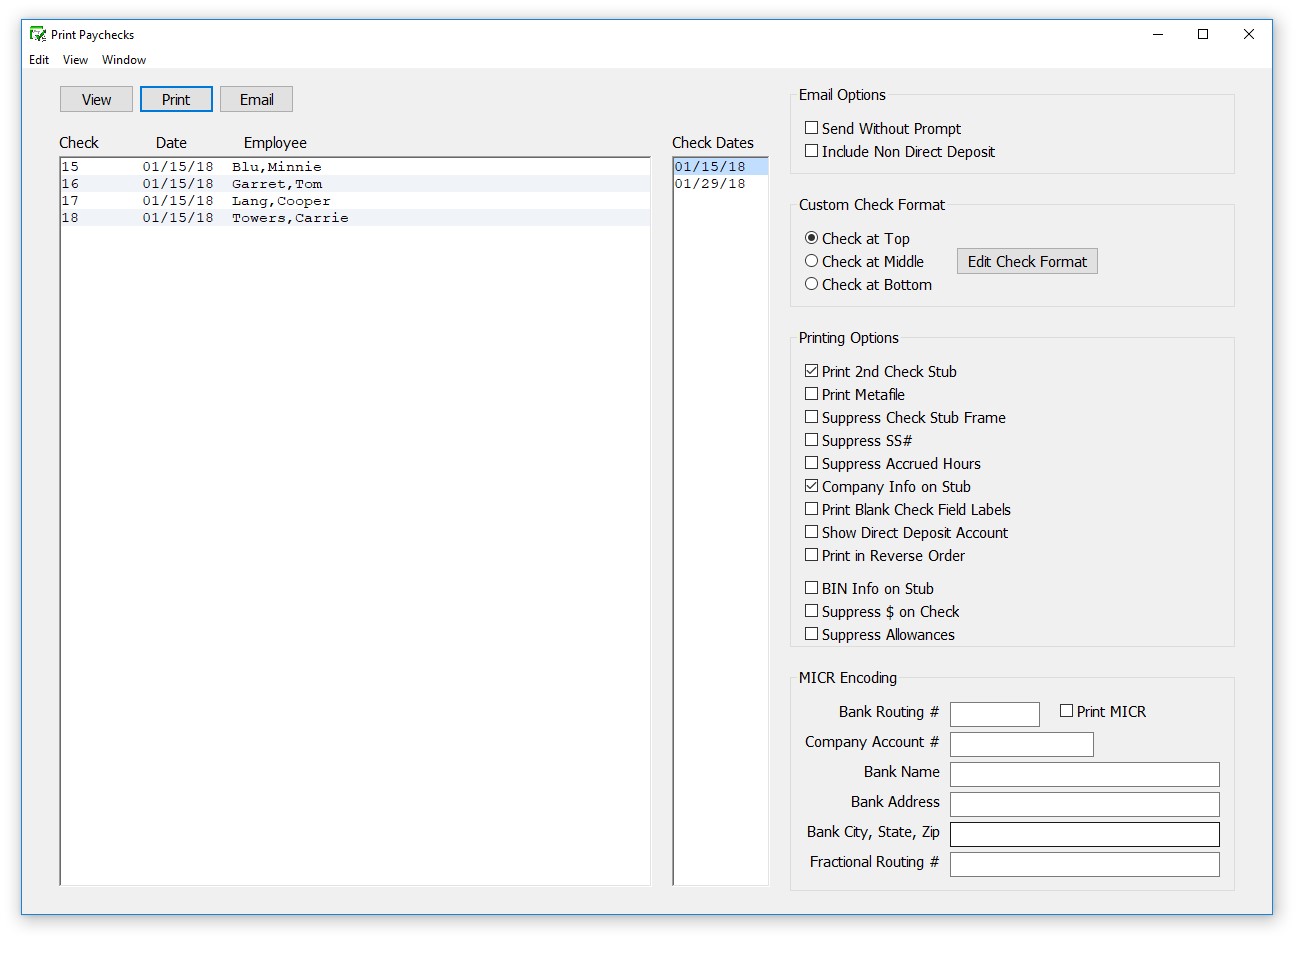
After you’ve created the paychecks, you can print them with the Print Paychecks window. Printing paychecks is an optional step because it’s not necessary for posting check information to the employee’s earnings records.
Paychecks can be printed or reprinted. Reprinting a paycheck doesn’t affect employee records. In the list, checks that have already been printed have an asterisk (*) after the check number.
You can select the print font and size for printing checks on the Select Print Font window located under the File menu.
- Click Payroll in the Command Center, then select Print Paychecks.
- Select the check date for the checks that you want to display in the list.
- Select one or more checks from the list.
If no checks are highlighted, all checks listed will be printed.
Note: If you have some employees set up for ACH or Web Direct Deposit, you should make sure they are not selected. Otherwise, you will print actual checks for them unnecessarily. You can always print their check information on blank paper, separate from the check run. Or select the Email button to email a stub to those employees.
- Select and set any necessary email, format and print options and click Print.
If one or more checks jam in your printer, you can reprint the check with a new check number. For details, see “Modifying Payroll Checks.”
Emailing Paystubs to Employees
You may wish to send paystubs to employees via email, especially employees who participate in direct deposit.
- Click Payroll in the Command Center, then select Print Paychecks.
- Select check date(s).
- Select check or series of checks from list.
- Review the different Printing Options and Email Options. Select or change as needed.
- Click the Email button.
An alert will appear for any paystub you try and send where no email address is entered in the employee setup window. The alert will include the employee’s last name.

Windows: Uses Messaging Application Program Interface (MAPI) that is a part of the Windows operating system. This feature may require additional setup in your email program. This feature does not necessarily interface with an internet based email program.
Macintosh: Emailing paystubs will only work with the Apple Mail program. To set Mail as the default mail program first launch the Mail program. Under the Mail menu, select Preferences. On the General tab, select the Mail program as the default. Close the Preferences window.
Email Options
Send Without Prompt: If you would like to have the email sent automatically without having to select the Send button in your email program for each employee, select this option. (Windows users may require some preference selection in your email program.)
Include Non Direct Deposit: Allows you to email paystub information to employees not set up as direct deposit employees.
Check Format
Default: Select this option if you use pre-printed laser checks that have the check positioned in the middle third of the page. Stubs are positioned top and bottom.
Check at Top: Select this option if you use a laser check that has the check positioned in the top third of the page, but you would like to align the printing fields on the check to coincide with pre-printed positions OR your check stock is blank and your are printing all fields on the check. If you have more than four Additional Incomes and/or eight Deductions for an employee, we recommend using check stock with the check on top.
Check at Middle: Select this option if you use a laser check that has the check positioned in the middle third of the page, but you would like to align the printing fields on the check to coincide with a pre-printed position OR your check stock is blank and you are printing all fields on the check.
Check at Bottom: Select this option if you use a laser check that has the check positioned in the bottom third of the page, but you would like to align the printing fields on the check to coincide with a pre-printed position OR your check stock is blank and you are printing all fields on the check.
Edit Check Format: This option is only available when Custom – Check in Middle or Custom – Check at Top is selected. Click this button to access the printing fields and be able to adjust their position and/or enable or disable the fields from printing. For details, see “Formatting Checks, W-2s, and W-3s.”
Printing Options
Print 2nd Check Stub: If Print 2nd Check Stub is checked, a second stub will be printed on the bottom third of an 8 1/2 by 11 inch laser check.
Print Metafile (Win) or Print PDF/PICT File (Mac): If Print Metafile or Print PDF/PICT File is checked, an Open dialog will appear when you print checks that allows you to select a Metafile or PDF/PICT to print along with the check
Note: Windows Metafiles and Mac PICT files are graphic files created outside the Payroll program using a graphics/drawing type program. These files can be created by you to add items to your checks such as company logos or special messages. Mac will also read/print a PDF file. When selected, the Metafile or PDF/PICT file will print on all checks selected.
Suppress Check Stub Frame: If Suppress Check Stub Frame is checked, the frame around the check stub that normally prints will be omitted.
Suppress SS#: If Suppress SS# is checked, employees’ Social Security numbers will not print on the check stub.
Suppress Accrued Hours: If Suppress Accrued Hours is checked, the accrued Hours Available and YTD Used hours will not print on the check stub.
Company Info on Stub: If Company Info on Stub is checked, your company’s name, address, city, state, zip and phone number from the Company Information window will appear across the top of the check stub.
Note: If check box “Use on reports and checks” on the Company Information screen is selected, the Trade Name will print on the check stub.
Print Blank Check Fields: If Print Blank Check Fields is checked, “Pay”, “To the Order of”, “Amount”, and “Authorized Signature” field labels on blank check stock used for MICR encoding will print. Available with middle check layout only.
Show Direct Deposit Account: If Show Direct Deposit Account is checked.
MICR Encoding
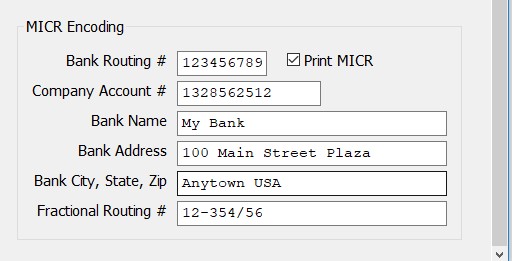
CheckMark Payroll will print the MICR Encoding information on blank check stock. To enable MICR printing, you must select the print MICR checkbox and fill in the appropriate bank information fields.

Note : The MICR encoding will not print on checks for employees who are marked to receive direct deposit.
Bank Routing # This is a nine digit number to identify your bank. It is usually the first nine digits at the bottom on a pre-printed check.
Company Account# This is your company account number at the bank. This field will accommodate up to 15 digits.
Bank Name, Bank Address, Bank City State, Zip: This is the information that identifies your bank.
Fractional Routing # Almost all checks have a fraction at the top right side of the check. Some do not. The fraction is shown as a hyphenated numerator (top) over a three to four digit denominator (bottom. This number is also called a Non-MICR ACH#.
Note: In most cases, the MICR software automatically prints the symbols.
Manually enter the symbols as:
Enter a “D” (capital D) to type a MICR hyphen: DS
Enter a “C” (capital C) to type this symbol: C
Enter an “A” (capital A) to type this symbol: A

