Chapter 11 Setting Up Deductions
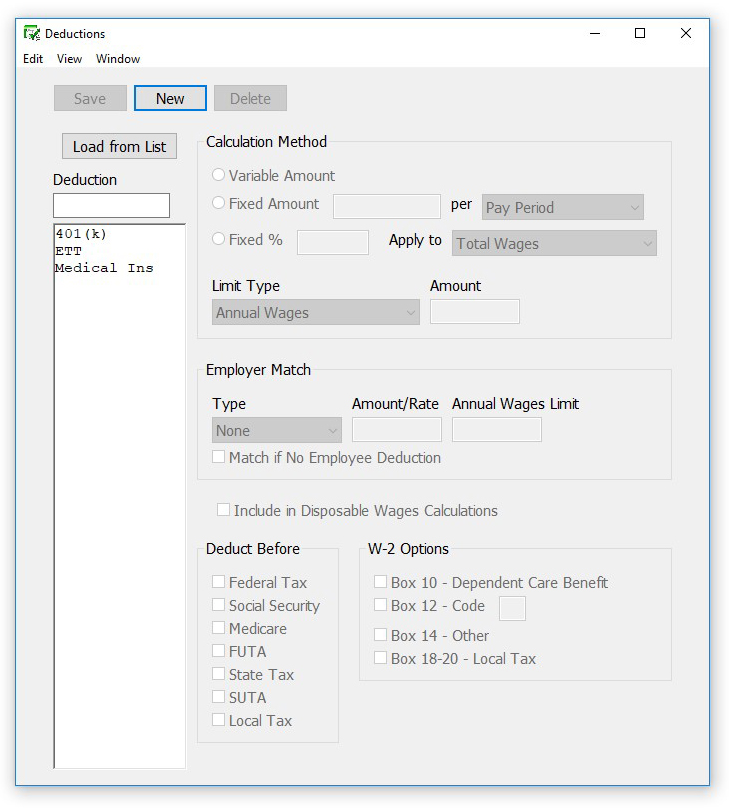
Use the Deductions window to set up deductions in CheckMark Payroll from employee’s pay. Depending on your location, deductions can be setup for special tax categories required to be withheld. CheckMark Payroll allows you to add pre-defined deductions, create new deductions, modify existing deductions or delete deductions not being used in the Deduction list. Pre-defined deductions can be modified once they are in the Deduction list.
Note: You can assign ledger accounts to each Deduction category for transferring or posting Deduction amounts to an accounting system. See “Chapter 14 Setting Up Ledger Accounts.”
You can define up to 60 Deduction categories for your company and assign up to 16 per employee.
Important DO NOT delete any Deduction categories once the first check for the year has been created. The only time a category should be deleted is after the New Year file has been created, but before any checks have been created.
DO NOT change the tax status on any Deduction category once the first check of the year has been created. To make a change to the tax set up mid year, stop the category from being applied by simply modifying the amount/rate to zero. Then create a new category with the correct tax set up to be applied.
Adding Pre-Defined Deduction Categories to Your Company
- Click Setup in the Command Center, then select Deductions.
- Click Load from List….
- Select one or more categories from the list.
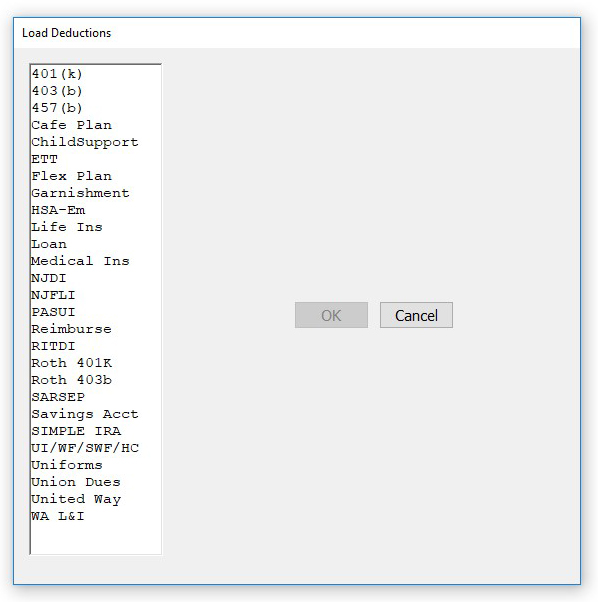
- Click OK.
Important: Pre-defined Deductions are setup using general tax guidelines. Verify the tax setup with current tax laws including your state and/or locality. You can modify any pre-defined deduction.
Creating a New Deduction Category
If you need a Deduction category that’s not pre-defined, use the New button to create a new one.
- Click Setup in the Command Center, then select Deductions.
- Click New.
- Enter a name for the category, up to 12 characters, and click OK.
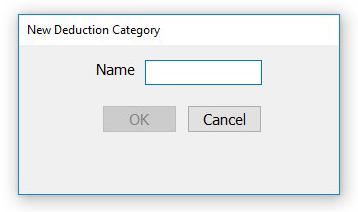
- Define the Deduction parameters. For further description of each parameter see “Items in the Deductions Window.”
- Click Save when you’ve finished defining the category.
- You will be prompted to change selected items for all employees assigned this deduction. Click OK.
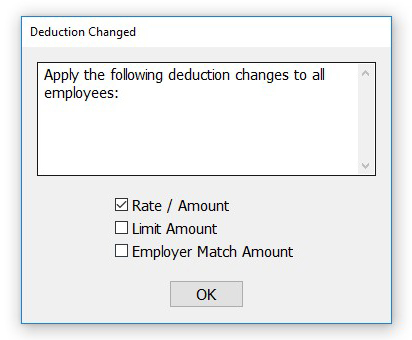
Change All pop up message: For each checkbox marked, the number entered in the Employee Setup under the Deductions tab will be overridden to the number set in this screen.
Example: A 401(k) annual deduction limit has changed for the payroll year and you modify the limit amount and hit the Save button. When the Change All pop up box comes up, select the Limit Amount checkbox the click OK. You will only have to modify any employee with a different limit amount rather than, most likely, the majority of employees.
Modifying a Deduction Category
Important: Do not change the tax status on any Deduction category once the first check of the year has been created. To make a change to the tax set up mid year, stop the category from being applied by simply modifying the amount/rate to zero. Then create a new category with the correct tax set up to be applied.
- Click Setup in the Command Center, then select Deductions.
- Select the category from the Deduction list.
- Make the necessary changes to the category’s definition.
- Click Save.
- You will be prompted if the deduction values (Rate/Amount, Limit
Amount, or Employer Match Amount) should apply to all employees assigned the deduction. Select the appropriate check boxes and click OK to make changes for all employees using the deduction.
Deleting a Deduction Category
You can delete a Deduction category as long as there are no employee checks or year-to-date balances associated with it and it is not assigned to any employees.
Important: Do not delete any Deduction categories once the first check for the year has been created. The only time a category should be deleted is after the New Year file has been created, but before any checks have been created.
- Click Setup in the Command Center, then select Deductions.
- Select the category from the Deduction list.
- Click Delete.
CheckMark Payroll asks you to verify that you want to delete the Deduction category.
- Click Yes to delete the category.
Items in the Deductions Window
Calculation Methods
Variable Amount Select Variable Amount if the Deduction amount for an employee varies with each pay period. If this option is selected, the amount that appears on the Calculate Pay window will always be 0.00 until you override and enter the amount of the deduction.
Fixed Amount per Pay Period, Hour Worked, 1st Chk of Month, or 1st Chk of the Quarter
Select Fixed Amount per Pay Period if the deduction amount is the same each pay period. Select Fixed Amount per Hour Worked if the amount deducted from an employee is multiplied by the number of hours worked of that pay period. Hour categories defined with the option to Use in Calculations Based on Hours Worked are used in this calculation.
Select Fixed Amount per 1st Chk of Month if the deduction amount is the same each month. The income will be deducted from the first paycheck created for the month.
Select Fixed Amount per 1st Chk of Quarter if the deduction amount is the same each quarter. The income will be deducted from the first paycheck created for the quarter.
There are two ways to handle a Fixed Amount deduction category:
- If the Fixed Amount is the same for all employees:
You can enter the amount in the edit box on this window. This amount will be entered automatically on the Calculate Pay window for all employees who are assigned this deduction.
- If the Fixed Amount is the different for each employee:
You enter 0.00 here and modify the rate/amount for each employee on the Deduction tab of the Employee Setup window. For more information on this, see “Setting Up Employee Deductions.”
Fixed % Select Fixed % if the amount deducted from an employee is calculated as a percentage of their wages. You can have this Fixed % be deducted from total wages, federal withholding wages, state withholding wages, Wages-Exempt Income, or SUTA wages by selecting the appropriate option from the Apply to: drop down list. The value entered here should be a percent, not a decimal value. For example, a decimal value of .015 should be entered as 1.5.
There are two ways to handle a Fixed % deduction category:
- If the Fixed % is the same for all employees:
You can enter the amount in the edit box on this window. This amount will be entered automatically on the Calculate Pay window for all employees who are assigned this deduction.
- If the Fixed % is the different for each employee:
Enter 0.00 here and modify the rate/amount for each employee on the Deductions tab of the Employee Setup window. For more information on this, see “Setting Up Employee Deductions.”
Note: If you have a deduction based on disposable wages you will need to choose Disposable Wages under the drop down for Apply to. This basic setup is subtracting all deductions required by law (Federal, State, Local, SS and Med are already included) from the employee’s gross earnings.
There are certain rules and situations on what is to be included or not included. For example, tips are not included for disposable earnings while state unemployment or disability tax is included. The Deduction and Additional Income setup screens both contain a checkbox for Include in Disposable Wages Calculations to include the calculation of disposable wages.
Deduction Limit Options
Limit Type You can set the Limit Type for a deduction defined as Fixed Amount (per Pay Period, 1st Check of Month, or Hour Worked) or Fixed % by selecting the appropriate Limit Type from the pop-up list. You can choose a deduction limit type of Annual Wages, Loan Amount, Annual Deduction Amount, Pay Period, or Monthly.
Note As with the calculation methods in the last section, if the limit amount is the same for all employees, enter the amount in this screen. If it is a different amount for each employee, insert 0.00 in this screen and modify the deduction limit amount in the Employee Setup under the Deduction tab.
- If you choose Annual Wages as the Limit Type, the deduction will be taken out of the employee’s pay each pay period until the employee’s annual wages meet or exceed the amount you enter in the edit box or the limit setup in the Deduction tab of the Employee Setup.
- If you choose Loan Amount as the Limit Type, the deduction will be taken out of the employee’s pay each pay period until the loan amount you enter in the edit box is reached.
- If you choose Annual Deduction Amount as the Limit Type, the deduction will be taken out of the employee’s pay until the annual deduction limit you enter in the edit box is reached.
- If you choose Pay Period as the Limit Type, the deduction will be taken out of the employee’s pay up to the maximum deduction limit for the pay period.
- If you choose Monthly as the Limit Type, the deduction will be taken out of the employee’s wages for each paycheck of the month until the deduction limit you enter in the edit box is reached for the month.
Employer Match Options
Employer Match Type You can set the matching type for a deduction by selecting either Fixed
Amount, Fixed %, or Hour Worked from the drop down list.
Amount/Rate Enter the amount or rate for the employer match. If you have Fixed Amount or Hour Worked selected as the Employer Match Type, the amount you enter in the Amount/Rate edit box is treated as a dollar amount.
If you have Fixed % selected as the Employer Match Type, the amount you enter in the Amount/Rate edit box is treated as a percentage of the employees wages. The rate entered can be modified for each employee in the Deductions tab in Employee Setup.
Wage Limit If necessary, enter the employee wage at which the employer match should stop calculating. This cannot be entered or overridden in the Employee Setup.
Match if No Employee Deduction
Use this box if a deduction has no employee portion, but should still have an employer portion. An example of using this box is for California’s ETT, Employer Training Tax. ETT does not have an employee deduction, but does have a Fixed % the employer contributes, so the Match if no Employee Deduction box should be checked.
Deduct Before Options
By checking the appropriate options, a deduction will be deducted
before the following taxes:
- Federal Tax
- Social Security
- Medicare
- FUTA
- State Tax
- SUTA
- Local Tax
See your Circular E, Employer’s Tax Guide or state tax guide to determine the correct handling of individual deduction items.
Box 10 – Dependent
Care Benefits
W-2 Box Selections
You should refer to the “Instructions for Form W-2” section of the IRS publication Federal Employment Tax Forms for guidelines about where deductions and codes should print on W-2s.
| Box 10 – Dependent
Care Benefits |
Checking causes the year-to-date total for the dependent care benefits deduction to appear in Box 10 of an employee’s W-2. |
| Box 12 |
Checking causes the deduction’s code and amount to be included in Box 12 on a W-2 form. |
| Box 12 – Code |
Check this option if you wish the Deduction amount to print in Box 12 of the W-2. A Code must also be entered when this is selected. Refer to the Instructions for Form W-2 from the IRS for the code to be entered here. Codes are entered as capital letters. |
| Box 14 – Other |
Checking causes the deduction’s name and amount to be included in Box 14 on a W-2 form. |
| Box 18 – 20
Local Tax |
Check this option if you wish the Deduction and description to print in Boxes 18-20 – Local Tax. Wages reported in box 18 are YTD wages even if the deduction was created and assigned mid-year. |

