
This article shows you how to create a new company in CheckMark Payroll and enter basic company information.
Create a New Company File
- In Windows, Double click the Payroll shortcut on the Desktop or click the Start menu, select Programs, then select CheckMark Payroll from the CheckMark Payroll group.
On Macintosh, Double-click the CheckMark Payroll alias in the dock or on your Desktop or double-click the CheckMark Payroll icon located in the install folder that was installed on your hard drive.
2. Choose New Company from the File menu.
The following window appears:
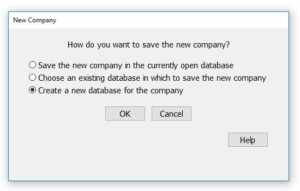
3. Select how you want to save the new company.
Save the new company in the currently open database
If you already have created a database already from the database manager, you can create a new company in that same database.
Choose an existing database in which to save the new company
If you want to create a new company in a different database that you have previously created, choose this option. Once you click OK, you’ll be prompted with an Open Dialogue box to browse and select the database you want to use.
Create a new database for the company
If you are just starting CheckMark Payroll program for the first time or want to create a new database for the company, choose this option.
Note: If this is a first-time setup, you won’t have an existing CheckMark Payroll company to copy from. The sample company that is provided contains example information only and it is not recommended for copying setup information. If you want to copy setup information from an existing CheckMark Payroll company, see “Copying From an Existing Payroll Company.”
4. Click OK.
5. Enter a name Company Name and Trade Name (if applicable).
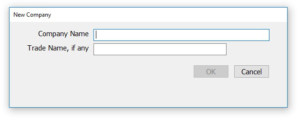
An alert appears asking if you want to copy setup data from an existing company. See, “Copying From an Existing Payroll Company.” for more information.
6. Finish entering the Company Information.
For more information on the fields on the Company Information window, see “Setting Up Company Information.”
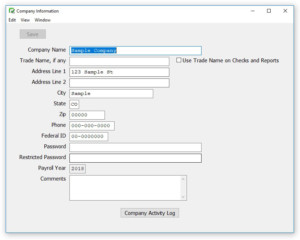
Once you’ve entered the basic Company Information, click Save and close the window. All sections should now be active on the Command Center.
Copying From an Existing Payroll Company
When you create a new Payroll Company, you have the option to copy certain setup data from an existing CheckMark Payroll company. You can copy Income and Deduction Categories, Departments, Hour Descriptions, Tax Tables, and Ledger Accounts.
Important: You can also import employee information. For more information on importing employee information, see “Import Employee Information.”
- Open CheckMark Payroll.
2. Choose New Company from the File menu.
An alert asking if you want to copy setup data from an existing company appears.
Note: The Default Payroll Company Database will be used to save your company information. If you wish to use a different database or rename the database, see “Database Manager.”

3. Click Yes. An Open dialog box appears.
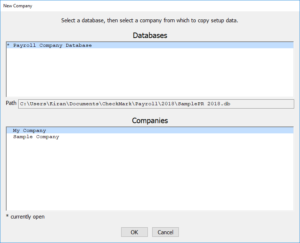
Note: Typically, you would not copy setup information from the “PR Sample Co, Inc.” since it contains only example information.
4. Select the company you wish to copy information from. Once that company is selected, click the New Company button.
5. Begin setting up your Company Information in the Company Information window.
