Types of Employee Paychecks Reports in CheckMark Payroll
Check Register The Employee Check Register report shows check data for the selected check dates, including number of hours, hourly rates, income, deductions, net pay, and department/job distribution percentages and amounts. Company totals are shown at the bottom of the report, including 941 liability and the number of checks in the selected period.
Posting Summary: The Posting Summary report shows check information in a summarized format and can be used to create manual journal entries in your accounting system. (You can also save the posting summary information as a text file that can be imported into an accounting program.)
The net for each check is shown, along with totals for wages, income, taxes, and deductions.
Ledger accounts are also shown with their associated amounts. If you have ledger accounts set up for department or job wages and taxes, then the ledger accounts and amounts for each department or job are shown. The total debits and credits are shown on the last two lines.
ACH Direct Deposit CheckMark Software allows you to utilize direct deposit for your employees through your financial institution. Payroll creates an ACH file that you can submit directly to your bank. For more information on setting up CheckMark Payroll for Direct Deposit, see “Using CheckMark Payroll for ACH Direct Deposit.”
The ACH Direct Deposit text file contains only checks created for employees who are set up as Direct Deposit employees on the Personal tab of the Employees window.
Web Direct Deposit You can export a file for use with National Payment Corporation’s Web Direct Deposit. For more information on Web Direct Deposit, see “Using CheckMark Payroll for Web Direct Deposit.”
The Web Direct Deposit text file contains only checks for employees who are set up as Direct Deposit employees on the Personal tab of the Employees window.
ACH NPC Direct Deposit You can export a file for use with National Payment Corporation’s Direct Deposit. For more information on ACH NPC Direct Deposit, see “Using CheckMark Payroll for ACH NPC Direct Deposit.”
The ACH NPC Direct Deposit text file contains only checks for employees who are set up as Direct Deposit employees on the Personal tab of the Employees window.
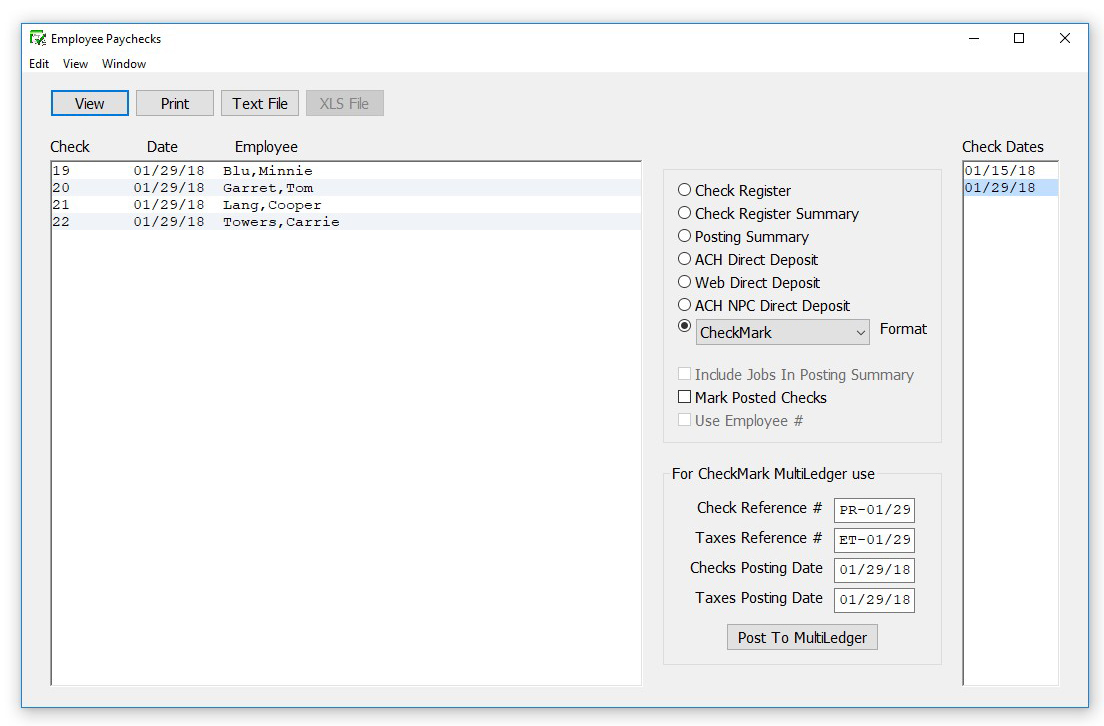
Employee Checks Report Options
Include Jobs in Post Summary: If you distribute wages or hours to MultiLedger Jobs, you should check this box before posting to MultiLedger. For more information on posting to MultiLedger, see Posting Payroll Information to MultiLedger.
Mark Posted Checks: If you post paychecks to one of the accounting packages listed in the Format menu, you can check this box so that each time you post paychecks, they will be marked with an “x.”
Use Employee # If using Web Direct Deposit and you would rather use an employee ID number instead of the Social Security number, you can mark this checkbox. You must also set up to use Employee ID # on National Payment Corporation’s Web Direct Deposit set up page. For more information on using Web Direct Deposit, see “Using CheckMark Payroll for Web Direct Deposit.”
Checks Reference #, Taxes Reference #, Checks Posting Date, Taxes Posting Date: These boxes are for posting information to Multiledger. For more information on using these boxes, see Posting Payroll Information to MultiLedger.
Posting File Formats
Quicken (QIF) You can export posting information to Intuit’s Quicken. Select the Quicken (QIF) option and click Text File. Enter Bank Account Name and whether you want to print checks from Quicken. A Save dialog appears. Enter a name for the text file and choose a directory in which to save it. Then, click Save.
QuickBooks (IIF) You can export posting information to Intuit’s QuickBooks program.
- Select the QuickBooks Format option from the dropdown menu and click Text File.
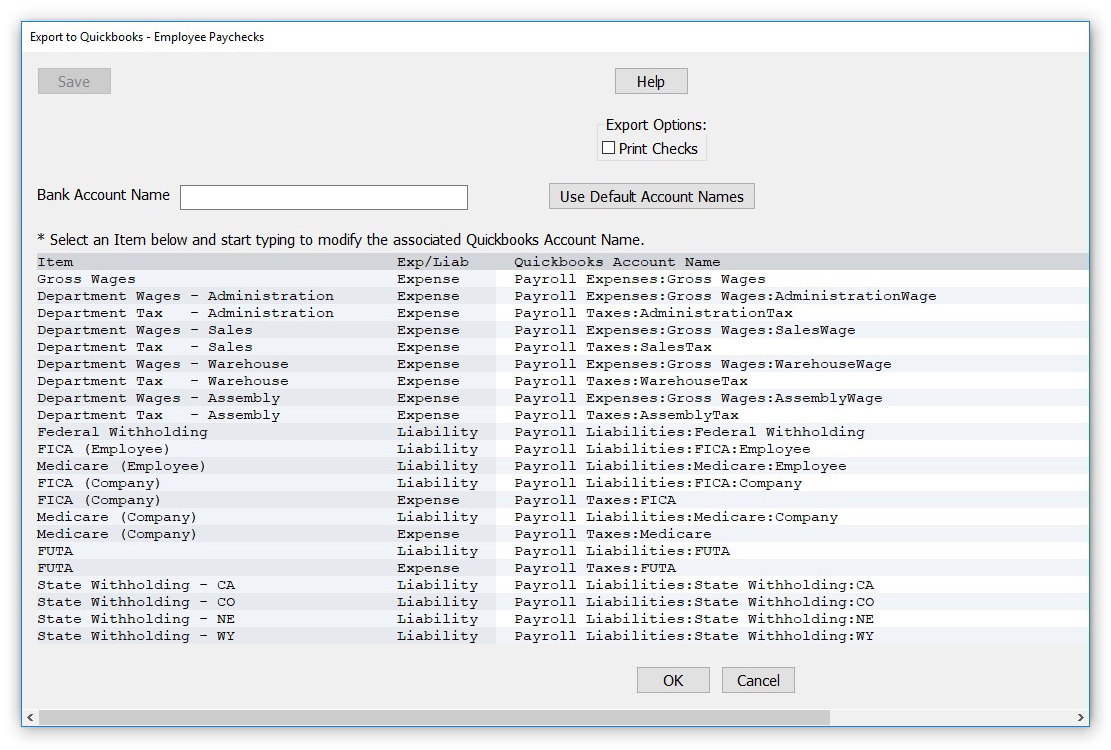
A pop up screen opens with a list of Expense and Liability accounts. You can use the Default Account Names or if you want to post to your current QuickBooks accounts, you can change the QuickBooks Account Name. To change the name, click the account you want to change under the QuickBooks Account Name column and type in a new name.
- Enter Bank Account Name and check the box if you want to print checks from QuickBooks.
- Click Save once you have finished entering your data.
- Click Ok. Enter a name for the text file and choose a directory in which to save it. Then, click Save.
Moneyworks You can export posting information to Moneyworks. Select the Moneyworks format option and click Text File. A Save dialog appears. Enter a name for the text file and choose a directory in which to save it. Then, click Save.
Peachtree 3.0 (Windows only) You can export posting information to Peachtree Accounting for Windows, version 3.0. Select the Peachtree 3.0 Format option and click Text File. A Save dialog appears. Enter a name for the text file and choose a directory in which to save it. Then, click Save.
Peachtree 3.5, 5.0 (Windows only) You can export posting information to Peachtree Accounting for Windows, version 3.5 or 5.0. Select the Peachtree 3.5,5.0 Format option and click Text File. A Save dialog appears. Enter a name for the text file and choose a directory in which to save it. Then, click Save.
Sage 50 / Peachtree You can export posting information to Sage 50. Select the Sage 50 format option and click Text File. A Save dialog appears. Enter a name for the text file and choose a directory in which to save it. Then, click Save.
M.Y.O.B. You can export posting information to Best!Ware’s M.Y.O.B.™ Select the M.Y.O.B. Format option and click Text File. A Save dialog appears. Enter a name for the text file and choose a directory in which to save it. Then, click Save.
Big Business You can export posting information to Big Business. Select the Big Business Format option and click Text File. A Save dialog appears. Enter a name for the text file and choose a directory in which to save it. Then, click Save.
CheckMark You can post information to CheckMark’s MultiLedger program. For more details about exporting to CheckMark’s MultiLedger, see Posting Payroll Information to MultiLedger.
Rakefet (Windows only) You can export posting information to Rakefet. Select the RAKEFET Format option and click Text File. A Save dialog appears. Enter a name for the text file and choose a directory in which to save it. Then, click Save.
DBA Software (Windows only) You can export posting information to DBA Software. Select the DBA SOFTWARE Format option and click Text File. A Save As dialog appears. Enter a name for the text file and choose a directory in which to save it. Then, click Save.
POS/OE 4 You can export posting information to POS/OE 4. Select the POS/OE 4 Format option and click Text File. A Save dialog appears. Enter a name for the text file and choose a directory in which to save it. Then, click Save.
Connected You can export posting information to Connected accounting. Select the Connected Format option and click Text File. A Save dialog appears. Enter a name for the text file and choose a directory in which to save it. Then, click Save.
Creating Employee Paycheck Reports
- Click Employee Paychecks in the Command Center.

- Select one or more consecutive check dates for the report.
You can select a consecutive or non-consecutive series of checks from the list.
If no checks are highlighted, all employee checks will be reported.
- Select the type of report.
- Click View, Print, Text File or XLS File.

