Quickly and easily track and manage your company’s payroll payments and expenses by generating employer payments reports in CheckMark Payroll, a comprehensive payroll solution for small businesses.
Types Employer Payments Reports
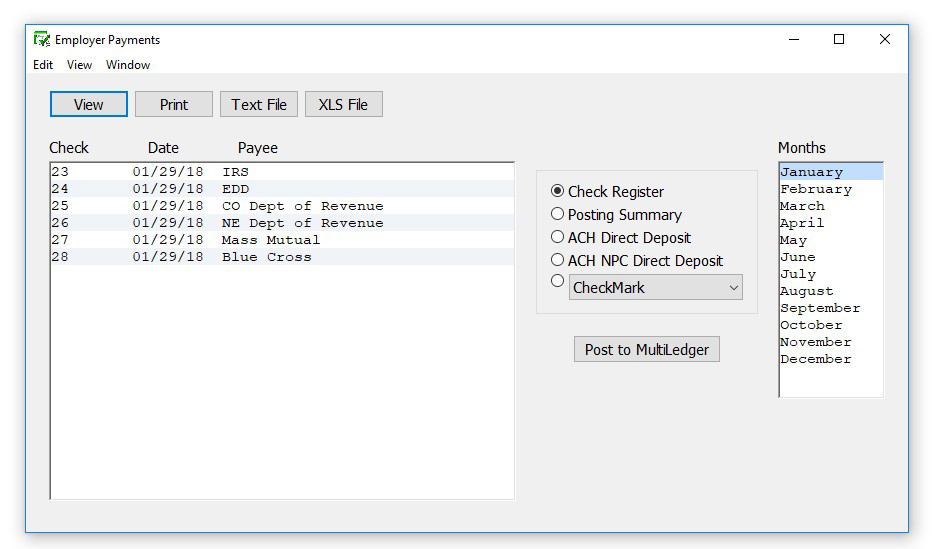
Check Register: The Check Register report shows check data for the selected month, including check number, check date, payee, payment description, and the check amount.
Posting Summary: The Posting Summary report shows check information in a summarized format and can be used to create manual journal entries in your accounting system. (You can also save the posting summary information as a text file that can be imported into an accounting program.)
Ledger accounts are shown with their associated amounts. The total debits and credits are shown on the last two lines.
Posting File Formats
Quicken (QIF): You can export posting information to Intuit’s Quicken. Select the Quicken (QIF) option and click Text File. A Save dialog appears. Enter a name for the text file and choose a directory in which to save it. Then, click Save.
For Quicken 2005 for Windows and higher users: CheckMark Payroll creates a QIF file for importing into Quicken. Quicken will no longer accept QIF importing directly into a bank/checking account; it will only accept Open Financial Exchange (OFX) file formats used for downloading information directly from the internet. This file format is not available in CheckMark Payroll.
QuickBooks (IIF): You can export posting information to Intuit’s QuickBooks. Select the QuickBooks (IIF) Format option and click Text File. A Save dialog appears. Enter a name for the text file and choose a directory in which to save it. Then, click Save.
CheckMark Payroll creates an Informational Interchange Format (IIF) file for importing checks into QuickBooks. The posting file format includes account names and account types to post all payroll information into the general ledger. The accounts named in the file are based on the set up of your payroll company in CheckMark Payroll Software. If these accounts DO NOT exist in your QuickBooks chart of accounts list, QuickBooks by default, will create the accounts upon import. Inserting ledger accounts into the Payroll program will not override the accounts created in the IIF file. We suggest that before importing payroll the first time you make a backup of your QuickBooks data. After successfully importing payroll into QuickBooks, carefully look through the transaction(s) imported and also evaluate the changes, if any, to your chart of accounts. If you do not wish these changes to occur, restore your QuickBooks backup and manually post your payroll data to QuickBooks.
Peachtree 2.0: (Windows only) You can export posting information to Peachtree Accounting for Windows, version 2.0. Select the Peachtree 2.0 Format option and click Text File. A Save dialog appears. Enter a name for the text file and choose a directory in which to save it. Then, click Save.
Peachtree 3.0: (Windows only) You can export posting information to Peachtree Accounting for Windows, version 3.0. Select the Peachtree 3.0 Format option and click Text File. A Save dialog appears. Enter a name for the text file and choose a directory in which to save it. Then, click Save.
Peachtree 3.5, 5.0 (Windows only) You can export posting information to Peachtree. Accounting for Windows, version 3.5 and 5.0. Select the Peachtree 3.5, 5.0 Format option and click Text File. A Save dialog appears. Enter a name for the text file and choose a directory in which to save it. Then, click Save.
M.Y.O.B. You can export posting information to Bestware’s M.Y.O.B.™ Select the M.Y.O.B. Format option and click Text File. A Save dialog appears. Enter a name for the text file and choose a directory in which to save it. Then, click Save.
Big Business You can export posting information to Big Business. Select the Big Business Format option and click Text File. A Save dialog appears. Enter a name for the text file and choose a directory in which to save it. Then, click Save.
Creating Employer Payments Reports
CheckMark: You can post information to CheckMark’s MultiLedger. For more information on posting to MultiLedger see “Posting Employer Checks to MultiLedger”
Rakefet (Windows only) You can export posting information to Rakefet. Select the RAKEFET Format option and click Text File. A Save As dialog appears. Enter a name for the text file and choose a directory in which to save it. Then, click Save.
DBA Software (Windows only) You can export posting information to DBA Software.
Select the DBA SOFTWARE Format option and click Text File. A Save dialog appears. Enter a name for the text file and choose a directory in which to save it. Then, click Save.
POS/OE 4 You can export posting information to POS/OE 4. Select the POS/OE 4 Format option and click Text File. A Save dialog appears. Enter a name for the text file and choose a directory in which to save it. Then, click Save.
Connected You can export posting information to Connected accounting. Select the Connected Format option and click Text File. A Save dialog appears. Enter a name for the text file and choose a directory in which to save it. Then, click Save.
Creating Employer Payments Reports
- Click Employer Payments in the Command Center.
- Select the month(s) for the report.
- Select the checks for the report.
You can select a consecutive or non-consecutive series of checks from the list. If no checks are highlighted, all employer checks will be reported.
- Select the type of report.
- Click View, Print, or Text File.

