Direct Deposit
CheckMark Payroll allows you to utilize direct deposit for your employees through your financial institution using ACH Direct Deposit or through National Payment Corporation using Web Direct Deposit.
Using CheckMark Payroll for ACH Direct Deposit
CheckMark Software allows you to utilize direct deposit for your employees through your financial institution. Payroll creates an ACH file that you can submit directly to your bank.
Tip: CheckMark Payroll also handles Web Direct Deposit via the internet through National Payment Corporation. For more information on getting set up for Web Direct Deposit, please contact National Payment Corporation at www.directdeposit.com. For more information, see “Using CheckMark Payroll for Web Direct Deposit.”
Before setting up information in CheckMark Payroll, you should contact your financial institution to see if they allow for direct deposit to employee accounts using the ACH format. Your bank will give you specific instructions and information you need to set up CheckMark Payroll for direct deposit.
After you have contacted your bank, follow these instructions to set up information in CheckMark Payroll.
Set Up Employees for ACH Direct Deposit
- Click Employees in the Command Center.
- Select an employee from the list on the right.
- Check Direct Deposit, then select Checking or Savings.
Select Checking if the employee wants his/her wages to be deposited in a checking account or select Savings if the employee wants his/her wages to be deposited in a savings account.
- Enter the employee’s nine-digit routing number for his/her bank in the Routing #1 field.
This number is 9 digits.
- Enter the employee’s account number for his/her bank in the Account #1 field.
This number can be up to 17 digits.
- If the employee is depositing into two accounts, enter the routing number of the second account into Routing #2 field.
- Select whether this account is a Checking or Savings account.
- Enter the account number of the second account into the Account #2 field.
- Enter the amount to be deposited into the second account into the Amount field.
- If necessary, check Prenote.
Prenote is typically only selected the first time that the employee paycheck is created for direct deposit. When your bank notifies you that the deposit went through correctly, you will deselect the Prenote option and click Save.
Note: If you’re using ACH Direct Deposit for the first time, you don’t need to check the Prenote box for employees. Instead, use the Prenote checkbox in the Direct Deposit setup window under the Employee Paychecks window.
Set Up ACH Direct Deposit Information
After you have set up employees for direct deposit as described earlier in this section, then processed payroll and created checks, you are ready to create the ACH file for submission to your bank.
- Click Employee Paychecks in the Command
- Select ACH Direct Deposit.
- Select one or more check dates.
The only checks that will be included in the ACH file are those for employees who are set up as Direct Deposit employees on the Personal tab of the Employees setup window.
- Click Text File.
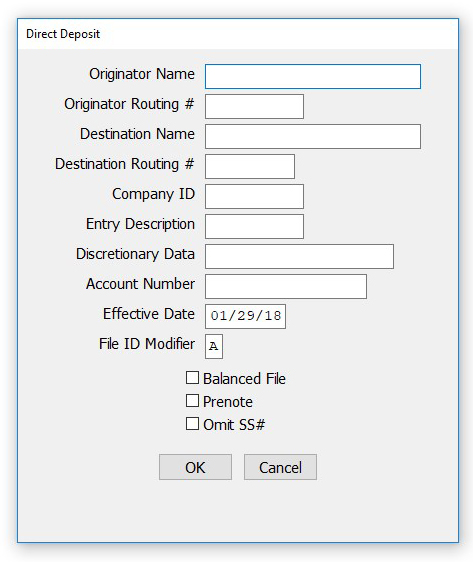
The following window appears:
Your bank or ACH provider should supply you with the information for this window.
- Once the information is entered, click OK.
After you have entered this information the first time it will be saved for future use. The only information you may have to edit each time is the Effective Date.
A Save dialog appears. The file is named Deposit by default. If your bank requires a different file name, you can change it.
- Choose where you want to save the file, then click Save.
Check with your bank for information on submitting the deposit file that was created.
Fields on the ACH Direct Deposit Window
Originator Name: This is usually your company name, but you should contact your bank to make sure of the exact name to enter. This field is limited to 23 characters.
Originator Routing # This is the nine-digit routing number of your bank, and is printed at the bottom of your checks. This field can accommodate up to ten characters.
Destination Name: This is the name of the institution receiving the ACH file. This field is limited to 23 characters. Your bank should provide you with this information.
Destination Routing # This is the nine-digit routing number of the institution that will receive the ACH file. Your bank should provide you with this information.
Company ID This is the ID number that identifies your company during the transaction. Check with your bank for the correct ID number to enter. This field can accommodate up to ten characters.
Entry Description This entry will appear on employee’s bank statement when his pay is posted to his account. This field is limited to 10 characters. Examples for this include PAYROLL, DIRECT PAY, or DIRDEPOSIT.
Discretionary Data This is for information your bank may have asked you to insert in your ACH file. Limited to 20 characters or 16 if all letters are capitalized.
Account Number This is the offsetting account number used in a balanced file. If your bank requires a balanced file, enter the necessary account number in this field. This field allows 17 numbers.
Effective Date This is the date you would like the transaction to take place. Typically it is one to two banking days after you have posted your ACH file. Your bank should let you know what the lead time is for the deposit.
File ID Modifier The default value is an “A.” Increment to “B”, “C”, and so on for additional files sent on the same day, if you are instructed to do so by your bank.
Balanced File If your bank requires a balanced file, place a checkmark in this box.
Prenote If necessary, check Prenote. This option zeroes out all records. Prenote is typically only selected the first time that your company submits an ACH direct deposit. When your bank notifies you that the deposit was processed correctly, you will no longer need to check Prenote.
Omit SS# This option omits the social security number on the ACH direct deposit file.

