CheckMark Knowledge Base CheckMark Knowledge Base

  • PRODUCTS
    • SOFTWARE
      • CheckMark Payroll
      • CheckMark MultiLedger
      • CheckMark 1099
      • CheckMark 1095
    • PAPER PRODUCTS
      • Checks & Envelopes
      • Business Forms
      • Tax Forms
  • SERVICES
    • HR Services
    • Time & Attendance
  • STORE
    • Online Store Home
    • Software
    • Software Updates
    • Bundles
    • Checks & Envelopes
    • Business-Forms
    • Tax Forms
    • HR Support
  • MORE
    • ABOUT COMPANY
      • Our Story
      • Culture
      • Contact Us
    • PARTNER PROGRAMS
      • Consultant Program
      • Software Partner
      • Resellers Program
    • SUPPORT
      • Request Support
      • Knowledgebase
      • Blog
      • Tutorials
      • Find a Consultant
  • Sign In
    • My Account
    • Other
      • HR Services
      • Time & Attendance
  • Free Trial
Home / CheckMark MultiLedger, Customer, Vendor and Item Reports / How to Create Vendor History Reports

How to Create Vendor History Reports

creating vendor history reports

Working with Vendor History Reports

  1. Select the vendor or vendors.

If necessary, scroll the list box to find the name of the vendor you want. You can also use the Find command under the Edit menu to select a vendor from a long list (for details, see “Using the Find Command with Reports.”

You can select a consecutive or non-consecutive series of vendors from the list (see “Making Selections in a Reports List.”

If no customer names are highlighted, all vendors will be reported.

If you have set up codes for your vendors and would like those codes to appear on reports, check the Show Code Field on Reports option on Preferences under the File menu.

  1. Select Transaction Detail, Transaction Summary, or ItemPurchase Detail from the pull-down menu.

For details, see the previous descriptions of the types of vendor history reports available.

  1. Select a month or range of months.
  2. Click View, Print, or Text File.

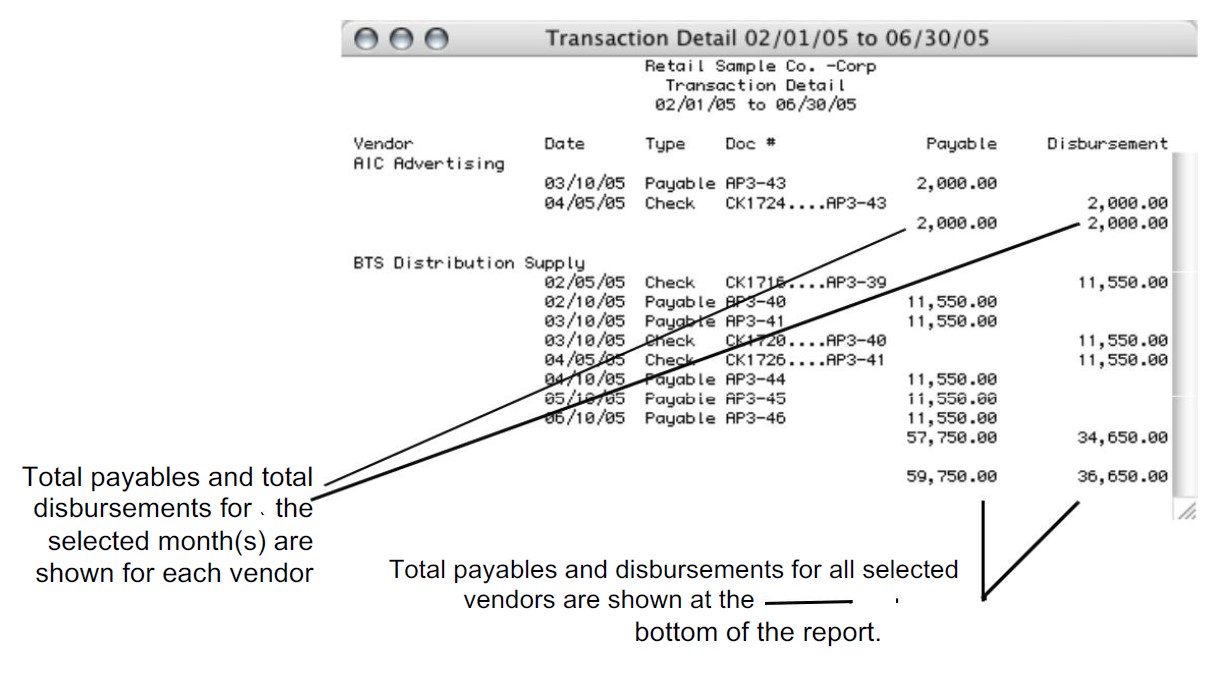
Transaction Detail report example:

208

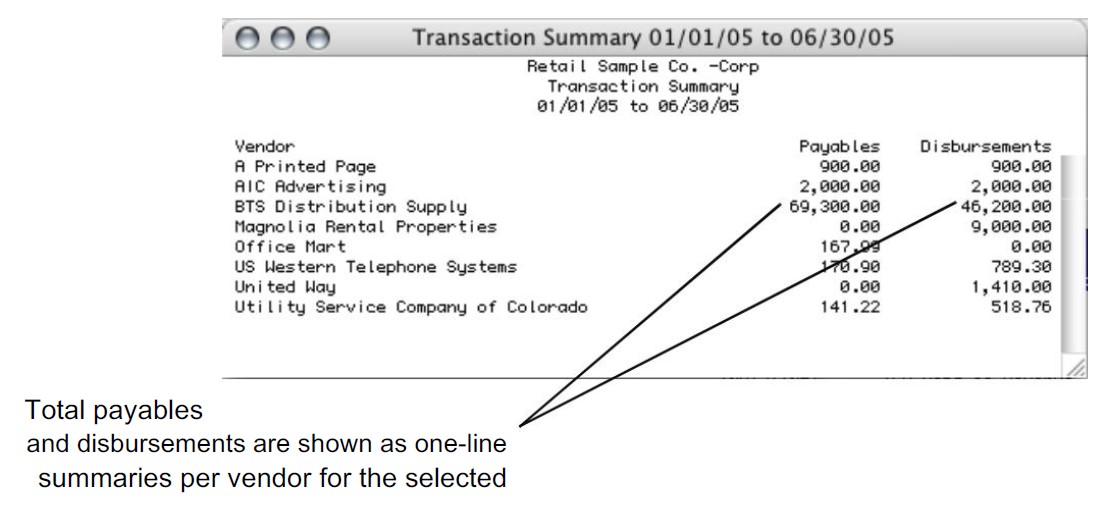
Transaction Summary report example:

209

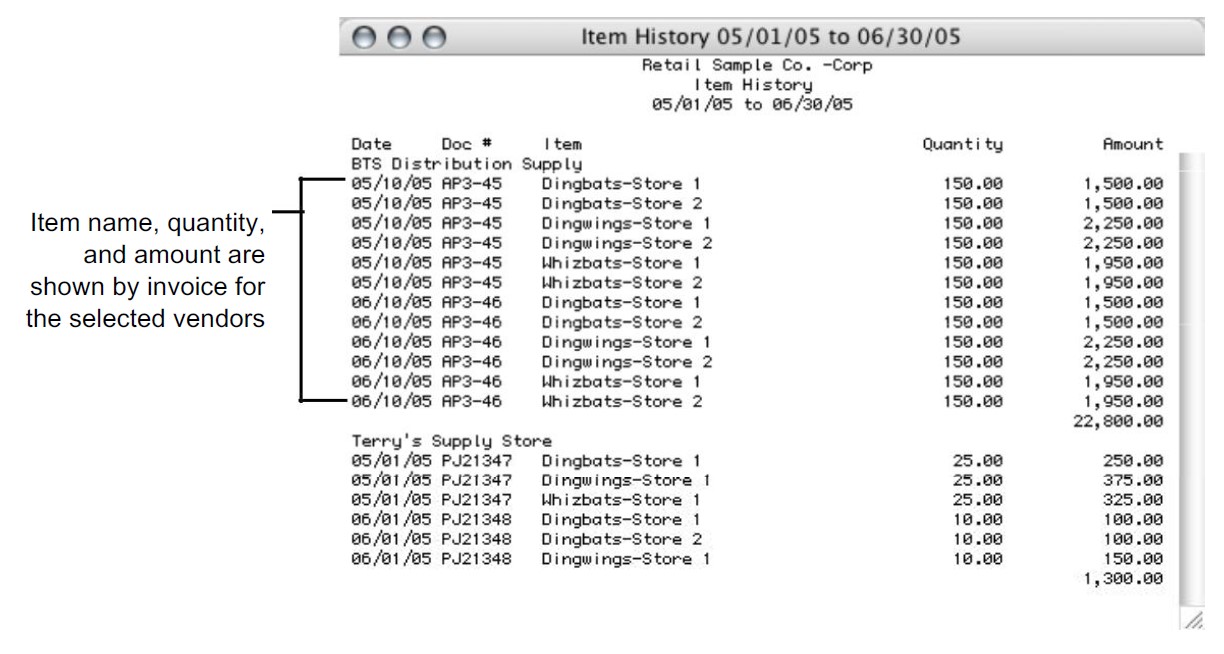
Item Purchase Detail report example:

210


Related Articles

How to Use Reports Window in CheckMark MultiLedger

Customer Reports in CheckMark MultiLedger

How to Create Accounts Receivable Reports

How to Create Customer History Reports

How to Create Customer Information Reports

How to Create Customer Statements

How to Create Vendor Reports

How to Create Accounts Payables Reports

How to Create Vendor Information Reports

How to Create and Print or E-File 1099 Information

Item Reports in CheckMark MultiLedger

How to Create Item Report

Related

CheckMark MultiLedgerCustomer, Vendor and Item Reports

Search the Knowledge Base

Browse by Topics

  • Getting Started
  • Initial Setup
  • Backing Up & Restoring
  • Multi-User
  • Setup Option
  • Customer, Vendor and Item Setup
  • Introduction to Transactions
  • Customer Transactions
  • Vendor Transactions
  • Other Activities
  • Integration with CheckMark Payroll
  • Customer, Vendor & Item Reports
  • Financial and Other Reports
  • Sample Chart of Accounts
  • AppleScript and Importing
  • Error Messages
  • Miscellaneous
accounting software

SOFTWARE

  • CheckMark Payroll
  • CheckMark MultiLedger
  • CheckMark 1099
  • CheckMark 1095

SERVICES

  • HR Services
  • Time & Attendance

PAPER PRODUCTS

  • Checks and Envelopes
  • Business Forms
  • Tax Forms

RESOURCES

  • Knowledge Base
  • Blog

ABOUT US

  • Our Story
  • Consultant Program
  • Software Partner
  • Resellers Program
  • Contact Us

CONTACT INFORMATION

  • 323 W Drake Rd, Ste. 100, Fort Collins, CO 80526
  • Tel: 970.225.0522
  • Fax: 970.225.0611
  • sales@checkmark.com

| | |

Terms of Service | Privacy Policy | Sitemap

Copyright © 2022 CheckMark, Inc.