
Setting Program Preferences
In MultiLedger you can set both program Preferences and User Settings. Options set on Preferences apply to all users in a particular set of company files. Options set on User Settings, on the other hand, apply to each individual user. For more information on User Settings, see the next section, “Setting User Settings.”
You can use Preferences under the File menu to set various MultiLedger options, such as checking for duplicate documents or hiding the cash balance on transaction windows.
After choosing Preferences from the File menu, the following window appears:
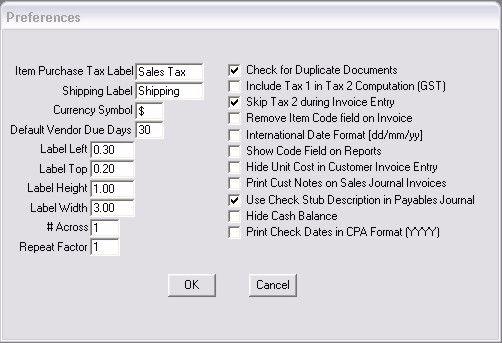
Select each option according to the following guidelines:
Check for Duplicate
If checked, a warning appears when you try to save a document number Documents that’s already been used in that journal window. MultiLedger looks for duplicate document numbers in the current month, the previous month and the future month, all based on the transaction date, when this option is checked.
Please Note: that some journal windows use the same numbering system. See “Document Numbers.” for more details.
Include Tax1 in Tax2 Computation
If checked, Tax 2 calculates a percentage of Tax 1. This accommodates the Canadian GST.
Skip Tax 2 During Invoice Entry
If checked, the second Sales Tax field is skipped on Customer Invoices. This box is automatically checked for new companies.
Remove Item Code Field on Invoice
This option will remove the item codes when printing invoices.
International Date Format (dd/mm/yy)
If checked, dates can be entered in the international day/month/year format instead of the month/day/year format.
Show Code Field on Reports
If this option is checked at the time you select a report to be viewed or printed, the code set up for the Customer, Item, or Vendor will appear.
This affects most reports printed or viewed from the Customer Reports, Vendor Reports, and Item Reports, except mailing labels for customers and vendors, Customer Statements, and 1099s.
Hide Unit Cost in Customer Invoice
If checked, the Unit Cost field for items doesn’t show on Customer Invoices.
Print Customer Notes on Sales Jrnl
If checked, the Notes and Add’l Notes you’ve set up for a customer print on Sales Journal invoices.
Use Check Stub Description in Payables Journal
If checked, the information entered in the Check Stub field on the payables journal will automatically be copied into the Description field on the next line.
Hide Cash Balance
If checked, the cash balance is replaced by asterisks (***) on Customer Payments, Vendor Payments, Receipts Journal, and Disbursements Journal. This is helpful if you want to allow users to enter transactions in these journals, but do not want them to see the balance in the cash account.
Print Check Dates in CPA Format (YYYY)
CPA stands for Canadian Payments Association. Mark this option if you are in Canada and must print checks in accordance to the regulations that the CPA sets. See the Canadian Payments Association’s website at www.cdnpay.ca for more information.
Item Purchase/PO Tax Label
You can use this field to change the sales tax label that prints on Item Purchases and Purchase Orders. “Sales Tax” is automatically assigned. If you are using pre-printed purchase orders that already have this label printed on them, you can remove this text.
Shipping Label
You can use this field to change the shipping amount label that prints on invoices. “Shipping” is automatically assigned. If you are using pre-printed invoices that already have this label printed on them, you can remove this text.
Currency Symbol
You can use this field to change from the dollar currency symbol ($) to another currency symbol such as £ on checks. Please Note: that this option simply changes the symbol that appears on checks, invoices and customer statements; it does not convert any currency values.
Default Vendor Due Days
You can use this field to change the number of due days assigned to new vendors. Thirty days is assigned by default.
Mailing Label Options
Label Left
Enter the number of inches from the left hand page edge.
Label Top
Enter the number of inches from the top of the page edge.
Label Height
Enter the height of each label in inches.
Label Width
Enter the width of each label in inches.
Across
Enter how many labels are across the label sheet.
Repeat Factor
Enter how many mailing labels should be printed for each selected customer or vendor. For example, a Repeat Factor of “3“will cause three mailing labels to be printed for each selected customer or vendor.
Note: Enter inches to (.01) hundreths of an inch.
Related Articles
How to Set Up Budget Amounts in CheckMark MultiLedger
How to Set Up, Modify & Delete Shipping Methods in CheckMark MultiLedger
How to Set Up Profit Centers in CheckMark MultiLedger
How to Set User Settings in CheckMark MultiLedger
How to Customize Financial Statements in CheckMark MultiLedger
How to Set Up, Modify & Delete Jobs in CheckMark MultiLedger
How to Set Up, Modify & Delete Sales Tax in CheckMark MultiLedger
How to Set Up, Modify & Delete Salespersons in CheckMark MultiLedger
How to Select Font for Printing in CheckMark MultiLedger
How to Use Print Screen in CheckMark MultiLedger
How to Set Up MICR Encoding Information in CheckMark MultiLedger
How to Format Checks, Invoices, Statements, 1099s & Deposits in CheckMark MultiLedger