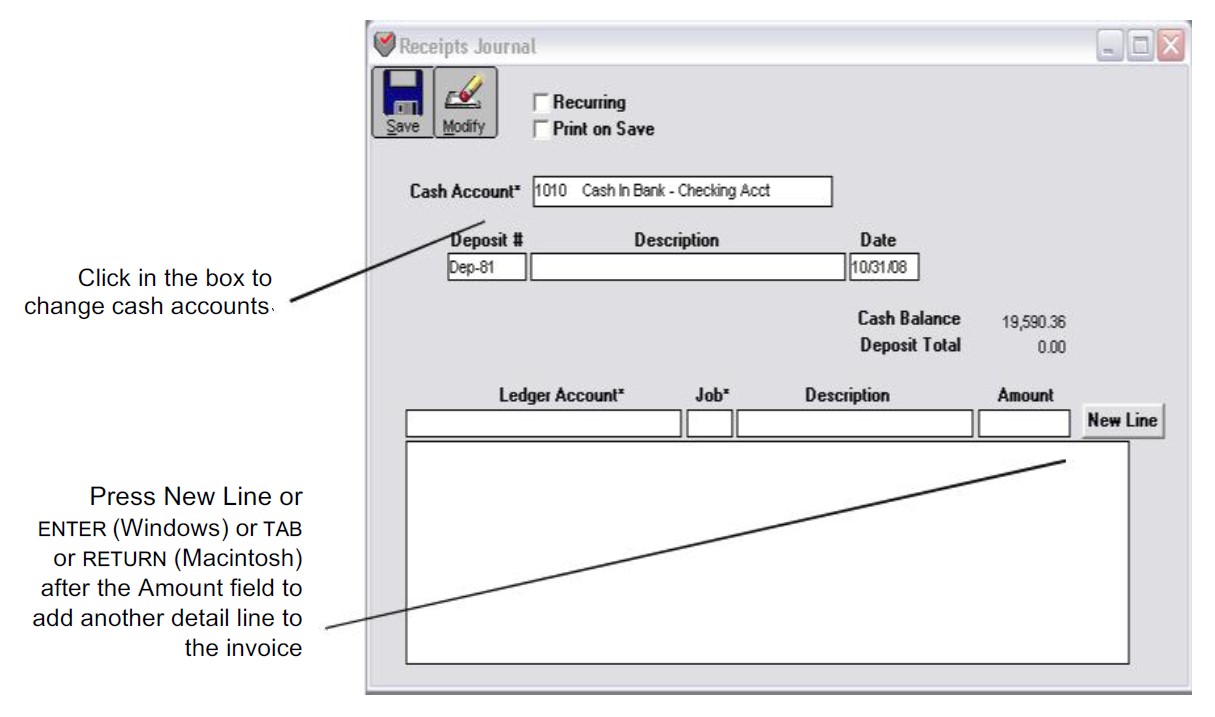
Receipts Journal
You can use the Receipts Journal to record a deposit that is the result of income not associated with an accounts receivable transaction. You can also record miscellaneous deposits, such as bank interest or a refund that you’ve received. Please Note: that because you can’t associate a Receipts Journal deposit with a customer name, deposits entered with the Receipts Journal do not affect customer transaction history.
Note: Customer payments against outstanding invoices should be recorded in Customer Payments.
Receipts Journal Field Descriptions
The following section discusses the individual fields in Receipts Journal.
Recurring
If you have Receipts Journal transactions that occur on a regular basis, you can save them with the Recurring option checked. You can define the frequency for a recurring entry and have MultiLedger remind you when the transaction should be created. For more details on working with recurring entries, see “Recurring Entries.“
Print on Save
If checked, the program will print a deposit slip with the total amount of the receipt. For more information on printing deposit slips, see “Using the Print Screen.”
Cash Account
The account shown will be increased by the Deposit Total when you save the document. This account is initially the account number that was assigned to the Cash Account on Interface Accounts. To change accounts, click the account shown and select another cash account from the pop-up list of accounts.
Deposit #
Enter a document number up to eight characters long to identify the receipt. The last character must be a number.
After the deposit is saved, the deposit number (or the last number of a combination of characters) is automatically increased by one.
Description
Enter a description up to 25 characters long. A description must be entered before the transaction can be saved.
Date
Simply type over the highlighted day or use the +/- keys on your keyboard to increment/decrement the date. You can enter a date from the 30 open months, provided the month isn’t locked, in the form MM/ DD/YY.
Ledger Account
Select a ledger account from the pop-up list. For more information on using pop-up lists, see “Using Pop-Up Lists.“
When you save the receipt, the account entered here is increased by the amount for the detail line. Usually, this is an income account in the 4000–4999 range.
Job
Select a job for this detail line from the pop-up list. If the Jobs pop-up list does not appear, no jobs have been set up, or Skip Jobs (CTRL – K on Windows or K on Macintosh) under the Edit menu is checked.
Description
When the cursor enters this field, the description for the deposit is automatically copied to it and highlighted.
You can enter up to 25 characters of descriptive text for a particular detail line on the deposit.
Amount
Enter an amount for the detail line. If the amount has zero cents, you don’t have to enter .00.
New Line (Windows Only)
To enter another detail line to the deposit, click New Line or press ENTER.
Cash Balance
This shows the current balance (from the general ledger) for the account listed for Cash Acct.
You can hide the Cash Balance on this window by choosing Hide Cash Balance on Preferences (under the File menu).
Deposit Total
This shows the total for the deposit as you add detail lines to the deposit. When you save the deposit, the Deposit Total amount increases the account selected for Cash Acct.
Recording a Deposit with the Receipts Journal
- Click Receipts Journal in the Command Center.
- If necessary, enter or change the deposit number.
The cursor moves to the Description field.
- Type in a description for this deposit.
- Verify that the date for the deposit is correct.
- Select a cash account for the deposit.
When you open the Receipts journal, the default cash account assigned on Interface Accounts is shown.
To change cash accounts, click in the box and select an account from the pop-up list.
For details about using pop-up lists, see “Using Pop-Up Lists.“
- Continue filling in the rest of the fields with the appropriate information.
For field explanations, see “Receipts Journal Field Descriptions.“
Note: You can add comment lines to the transaction at any time by choosing Insert Line from the Edit menu (CTRL – I on Windows or I on Macintosh). For more information, see “Adding Comment Lines to Transactions.“
- After you’ve entered a ledger account (usually this is an income account in the 4000-4999 range) and amount (Job and Description are optional), press TAB to add the detail line to the deposit.
As you add detail lines to the deposit, the Deposit Total field is updated.
- On Windows, if necessary, click New Line or press ENTER to begin entering another item.
On Macintosh, if necessary, press TAB or RETURN again to begin entering another item.
- When you are finished entering all the information for the transaction, click Save.
When the transaction is saved, it is posted automatically to the general ledger, and the deposit number is increased by one.
Modifying or Deleting Receipts Journal Documents

When the cursor is in the Deposit # field, the Modify button is enabled. Click Modify to see a list of Receipts Journal transactions that you can modify or delete. If the transaction you’re looking for doesn’t appear, you may have to select another month from the pull-down menu.
Please Note: that the transactions that appear here also include deposits recorded in Customer Payments. For more details, see “Modifying or Deleting a Transaction.“
Related Articles
Customer Transaction Flowchart
How to Record Sales in MultiLedger
How to Use Customer Invoices in MultiLedger
How to Use Sales Journal in MultiLedger
How to Use Customer Payments in MultiLedger
How to Create Quotes in MultiLedger