
This chapter explains how to e-file ACA forms for submission through the IRS Affordable Care Act Information Returns (AIR) System using CheckMark Online 1095. Before creating an e-file, ensure that your company and employee information has been completed and validated.
E-Filing ACA Forms
If you are new to ACA e-filing, you must register with the IRS AIR Program and obtain a Transmitter Control Code (TCC) before submitting returns electronically. Because IRS approval can take several weeks, it is recommended that you complete the registration process 45–60 days before the filing deadline.
Note: E-filing is available only to customers who have purchased the CheckMark Online 1095 E-File Version.
Creating an ACA E-File
Note: Before submitting your first production filing to the IRS, you must successfully complete the required IRS communication test.
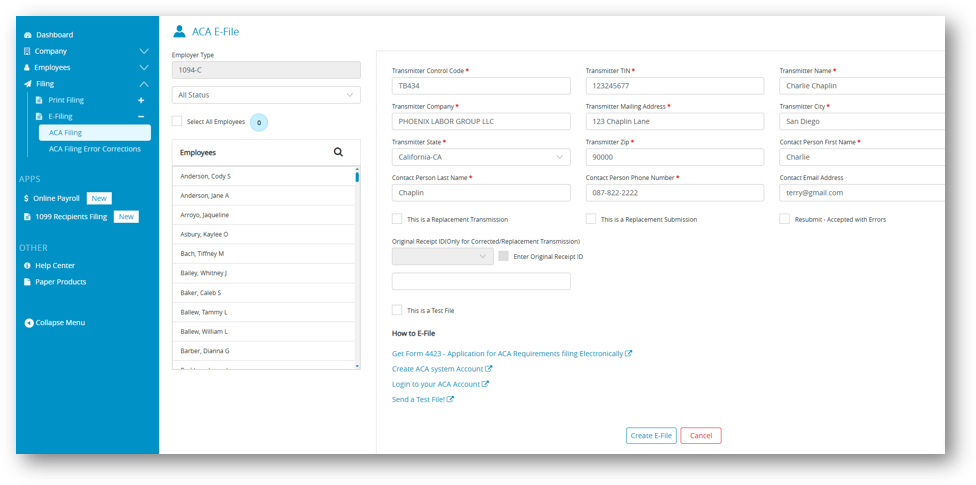
- Select Filing > E-Filing.
- Click ACA Filing.
- Enter the required Transmitter Information.
- Select the employee records to include in the filing.
Note: You must select at least one employee. If no employees are selected, the Create E-File option is unavailable.
- If you are creating your first submission for IRS testing, select This is a Test File.
- If you have already completed the IRS communication test successfully, leave This is a Test File unchecked to create a production filing.
- Click Create E-File.
- If validation errors are found in the company or employee information, a warning message is displayed.
- Click Cancel to return and correct the information.
- If you have reviewed the information and want to continue, click Continue Anyway.
- An XML file is generated and downloaded to your computer. Submit this XML file through the IRS AIR System.
Important: Review the generated XML file and ensure all company and employee information is accurate before submitting it to the IRS.
ACA E-File Error Corrections
If the IRS rejects your ACA e-file or accepts it with errors, you can use the ACA Filing Error Corrections feature to identify the issues, update the affected employee records, and resubmit the corrected filing.
Uploading a Rejected or Accepted-with-Errors File
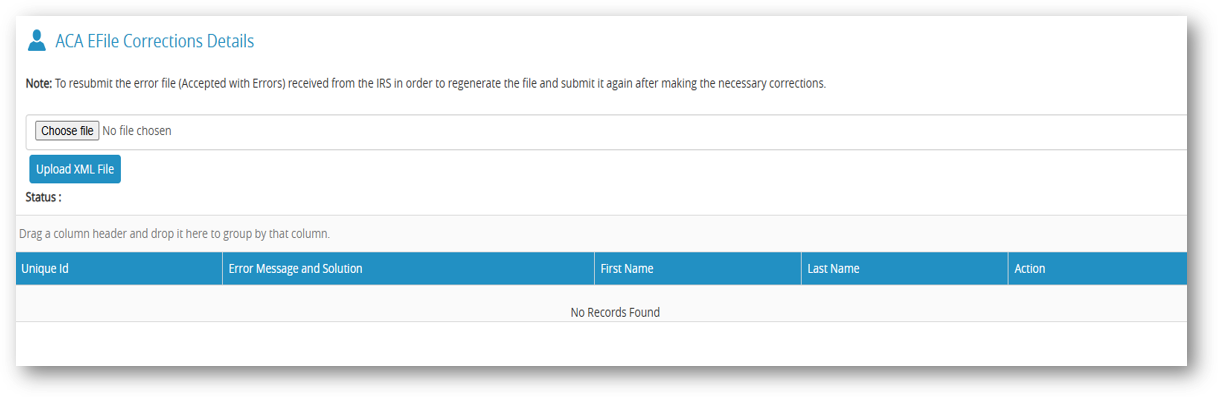
- Select Filing > E-Filing.
- Click ACA Filing Error Corrections.
- Click Choose File and browse to the rejected or accepted-with-errors XML file on your computer.
- Select the XML file and click Upload XML File.
The application reads the uploaded file and automatically retrieves the Original Submission ID. It also determines whether the filing was Rejected or Accepted with Errors.
Reviewing and Correcting Errors
After the XML file has been processed:
- The application automatically interprets supported IRS error codes (14–18), eliminating the need to look up the error descriptions manually.
- A list of employees with filing errors is displayed.
- Each employee’s error is described along with the information that needs to be corrected.
- Update the required information directly on the screen and click Save.
Resubmitting the Corrected Filing
After correcting all validation errors:
- Return to Filing > E-Filing.
- Open the ACA Filing screen.
- Select the corrected employee records for resubmission.
- Choose the appropriate Original Submission ID from the drop-down list.
- If you are correcting a filing that was Accepted with Errors and want to retain the original Receipt ID, select the Resubmit checkbox.
- The original Receipt ID is automatically populated.
- You can edit the Receipt ID manually if necessary.
- Click Create E-File to generate the corrected XML file.
The application preserves the required Submission ID and Receipt ID values during resubmission, ensuring the corrected filing meets IRS resubmission requirements.
Related Links: