
In MultiLedger, the General Ledger report shows the General Ledger accounts with their detailed activity for selected months. You can also create year-to-date reports. If you only want ending balances and not the daily details, create a trial balance report (see “Trial Balance Reports”).
- Click General Ledger in the Command Center.
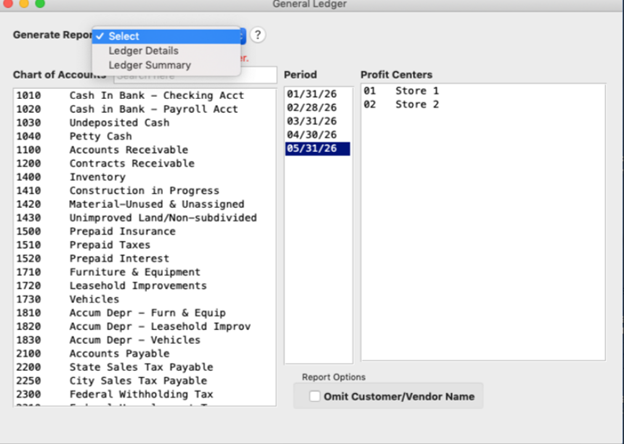
- Select the account or accounts for the report.
If necessary, scroll the list to find the name of the account you want.
You can select a consecutive or non-consecutive series of accounts(see “Making Selections in a Reports List.”
If no accounts are selected, all accounts will be reported.
- Select a period for the report.
You can select a consecutive series of months (see “Making Selections in a Reports List.”
You can create a year-to-date General Ledger report by selecting all the periods from the beginning of the year through the last month of the year.
- If necessary, select one or more Profit Centers.
If you select one or more Profit Centers, then just the accounts that have been set up for those Profit Centers will be reported.
- If necessary, select Omit Customer/Vendor Name
If you select the checkbox to Omit Customer/Vendor Name, that column will not show on report.
- Click on General Ledger. A dropdown list is available to select Ledger Summary or Ledger Details. Choose the desired option to view, download, print, or export the report as a Text or CSV file.
Note: In 32-bit applications, the View, Print, Text File, and XLS Files buttons are available directly on the screen.

Drill Down on General Ledger Report
The General Ledger report has a drill-down function that allows you to quickly move to an original transaction to see details or make modifications. To utilize the drill-down capabilities, do the following:
- While viewing a General Ledger report, move the pointer over the desired transaction.
The pointer tool changes to a magnifying glass tool.
- With the magnifying glass tool, click on the transaction you want to see in drill-down mode.
The transaction journal that was used to create the original transaction opens and the transaction appears. You can modify the transaction if necessary. For more details on modifying transactions, see
“Modifying or Deleting a Transaction.” After you
modify the transaction, open report windows need to be refreshed by closing the report window and reopening it before the modified transaction will appear.
- To return to the General Ledger report, either click Save, then close the transaction window or click the transaction window’s close button. You can also choose General Ledger from the Windows menu.
If you close the transaction window without making changes or without saving any changes you have made, a Save Changes message appears. If you click Yes, you return to the transaction window. Click Save, then close the transaction window; you then return to the General Ledger report window. If you click No, you return to the General Ledger report window.
General Ledger report example:
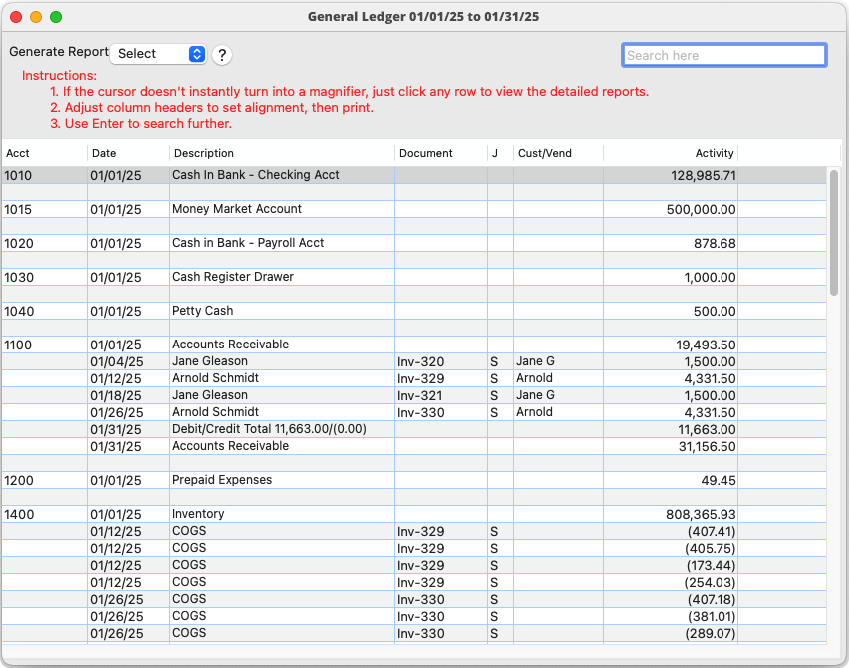
The J column on the General Ledger report shows the initial of the journal that was used to create the transaction. The journal initials represent the following:
D – Transactions created in the Disbursements Journal or Vendor Payments.
P – Transactions created in Item Purchases or the Payables Journal.
S – Transactions created in Customer Invoices or the Sales Journal.
R – Transactions created in the Receipts Journal or Customer Payments.
G – Transactions that were created in the General Journal, and include transactions created in Adjust Inventory.
Related Articles
How to Create Chart of Accounts Report
How to Create Trial Balance Report
How to Create Transaction Journals Reports
How to Create Balance Sheet Report
How to Create Income Statement Report
How to Create Cash Flow Reports
How to Create Financial Snapshot Reports
How to Create Sales Tax Reports